Top | The Abydos Helicopter | Hesire's Tomb Door | Giza Pyramid Temples |
Previous - Exact Reconstruction of the Giza's Groundplan | The Nazca Monkey Report |
Next - Testing the Nazca Monkey for Connections to the Great Pyramid |
The
key
idea behind recreation of Petrie's Giza ground plan is shared by both
the Athena-engraving and
the Nazca Monkey glyph. Each work evolves from a 5-pointed star
(the Mother-star) constructed by a unique 13-step method. The latter
two works have enough in common
to leave no doubt that they are authored by the same agency; however,
for
an ironclad proof that the Giza plan itself belongs with the other two,
it itself has to have a clear presence there. Otherwise, all the evidence, although compelling, is still questionable, as it is theoretically possible that the entire idea could occur to the Giza planners independently. Therefore, we take the Giza ground plan and unite it with the Athena-engraving first and with the much simpler Nazca Monkey later. The original Mother-star is already there, so all we have to do is to add the Giza plan to it. Do the two works share more than the star? 
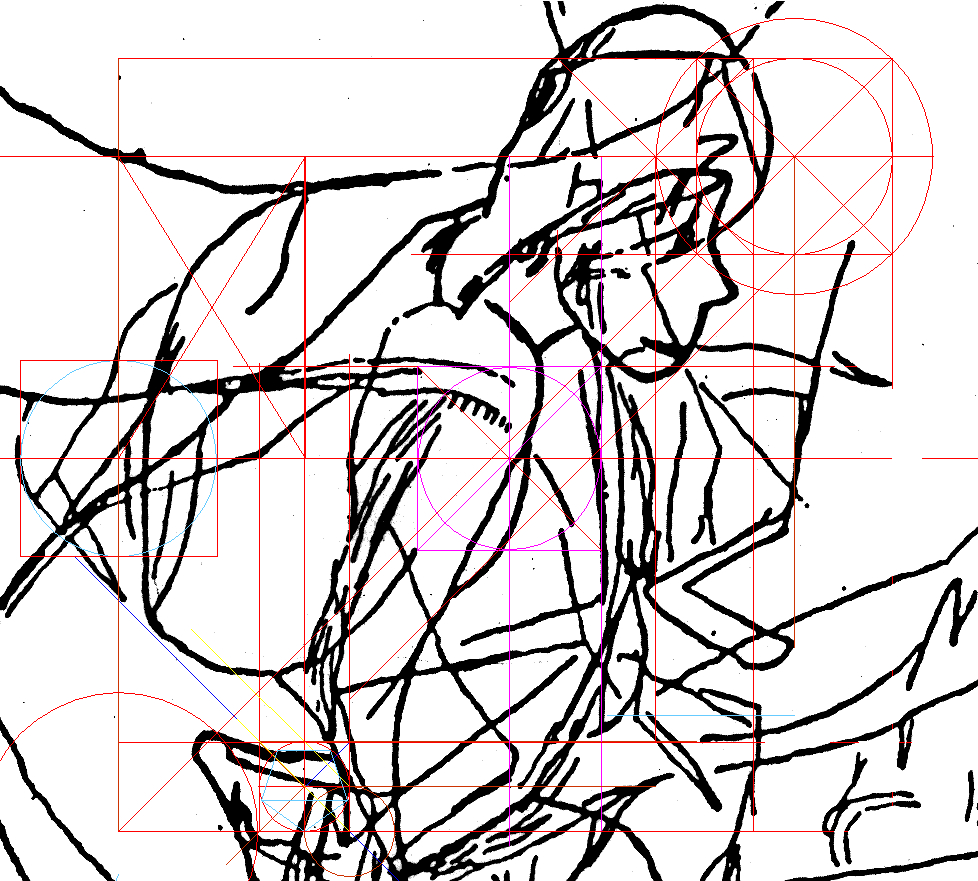
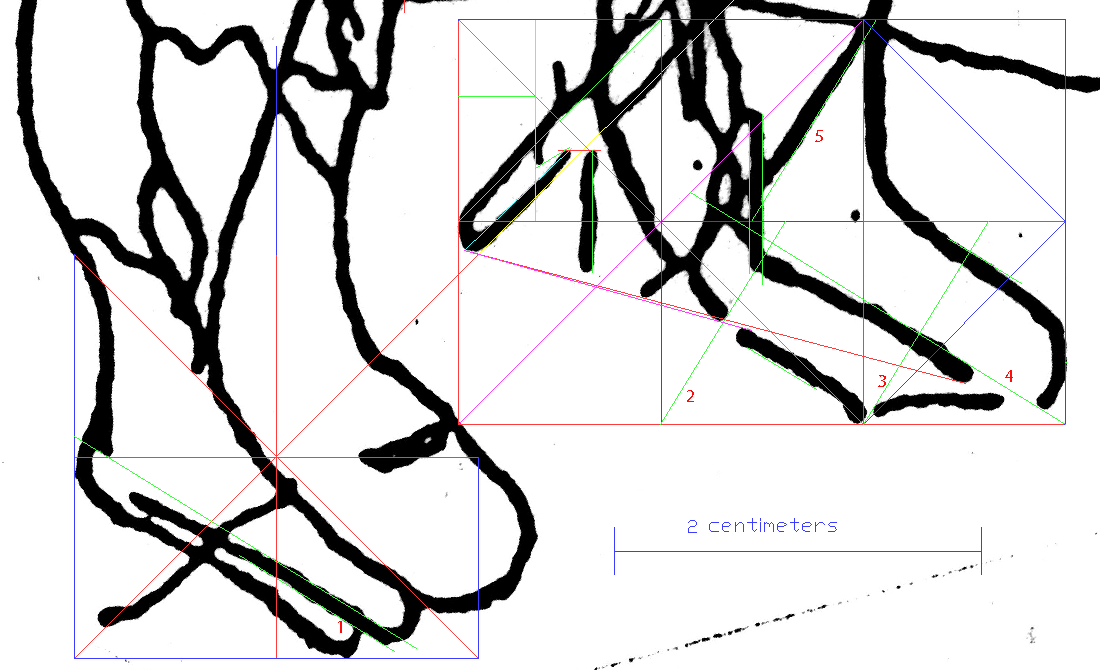
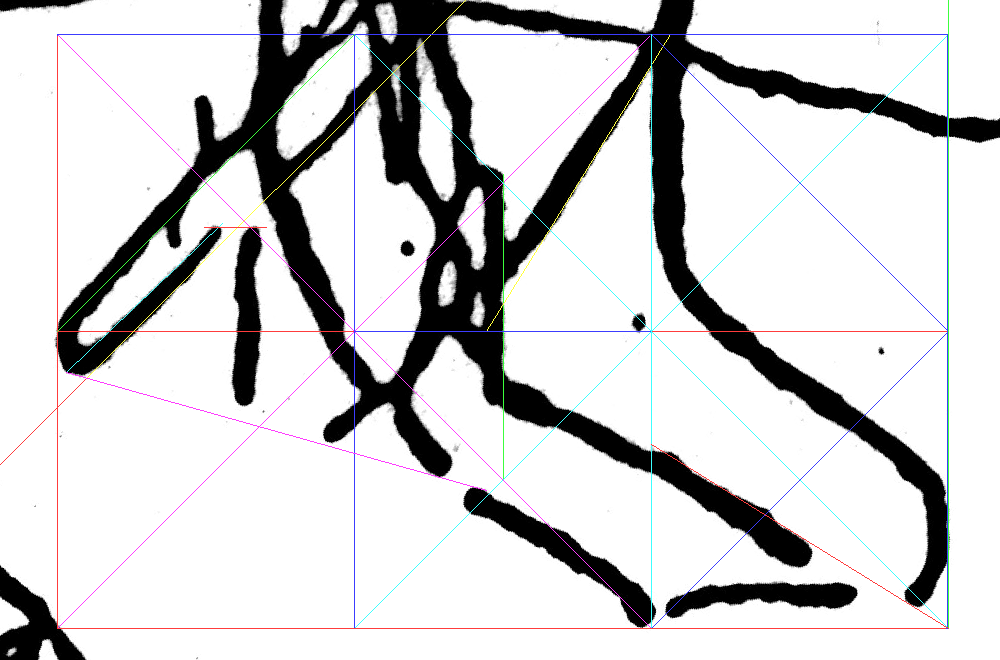
Pyramids Over the Engraving I admit to feeling some anxiety prior to the test. After all, I have not noticed anything resembling the Giza plan in these works before despite spending a lot of time on their geometry. The sight of the pyramids over the engraving had eased that anxiety. For one, it made a secret wish of mine come true - to see the Great Pyramid involved in Athena's head. Looking at the mutual positions of the head and the Great Pyramid for a while, you may get an impression of an open cash register or CD player. Close the tray; hear it click, and the music begins.. ![]() Eventually, the experiment exposes the Great Pyramid as the dominant, albeit not the only, factor in Athena's head structure. The Second Pyramid and the Foot/Head-square are also an influence. Initial observations: * Each pyramid has a side that coincides over some distance with an edge of an engraved line. * Extended sides, axes, and diagonals coincide with engraved lines. * For example, the right side of the Second Pyramid follows an engraved line, and when extended, engraved lines dip in and out of sight on its course. * Its diagonals clearly relate to the ends of engraved lines in both left corners of the pyramid. 
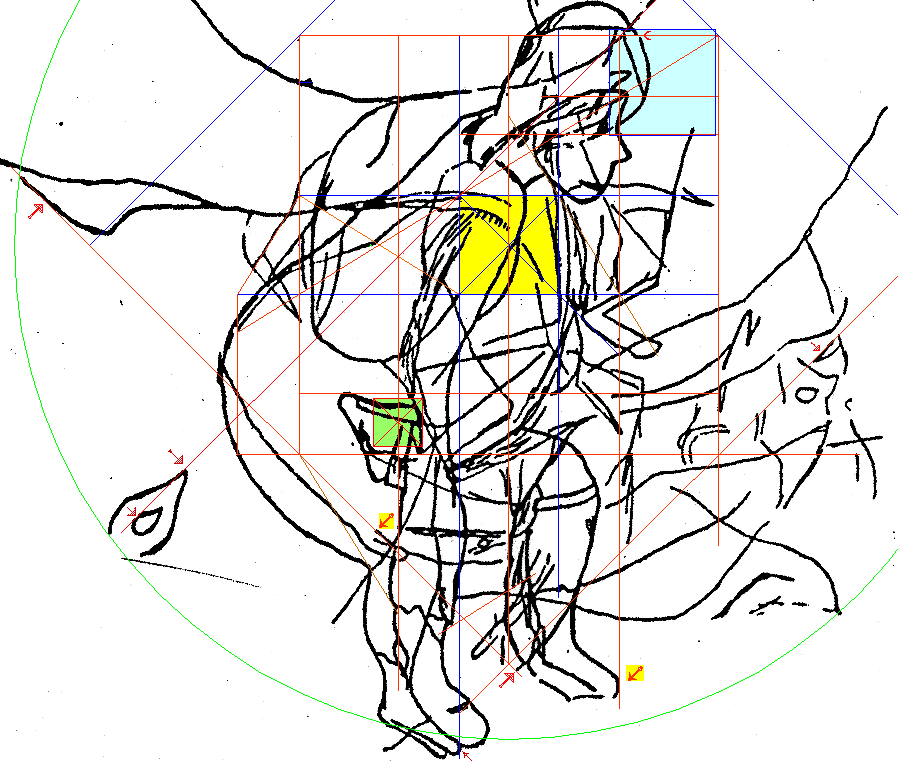
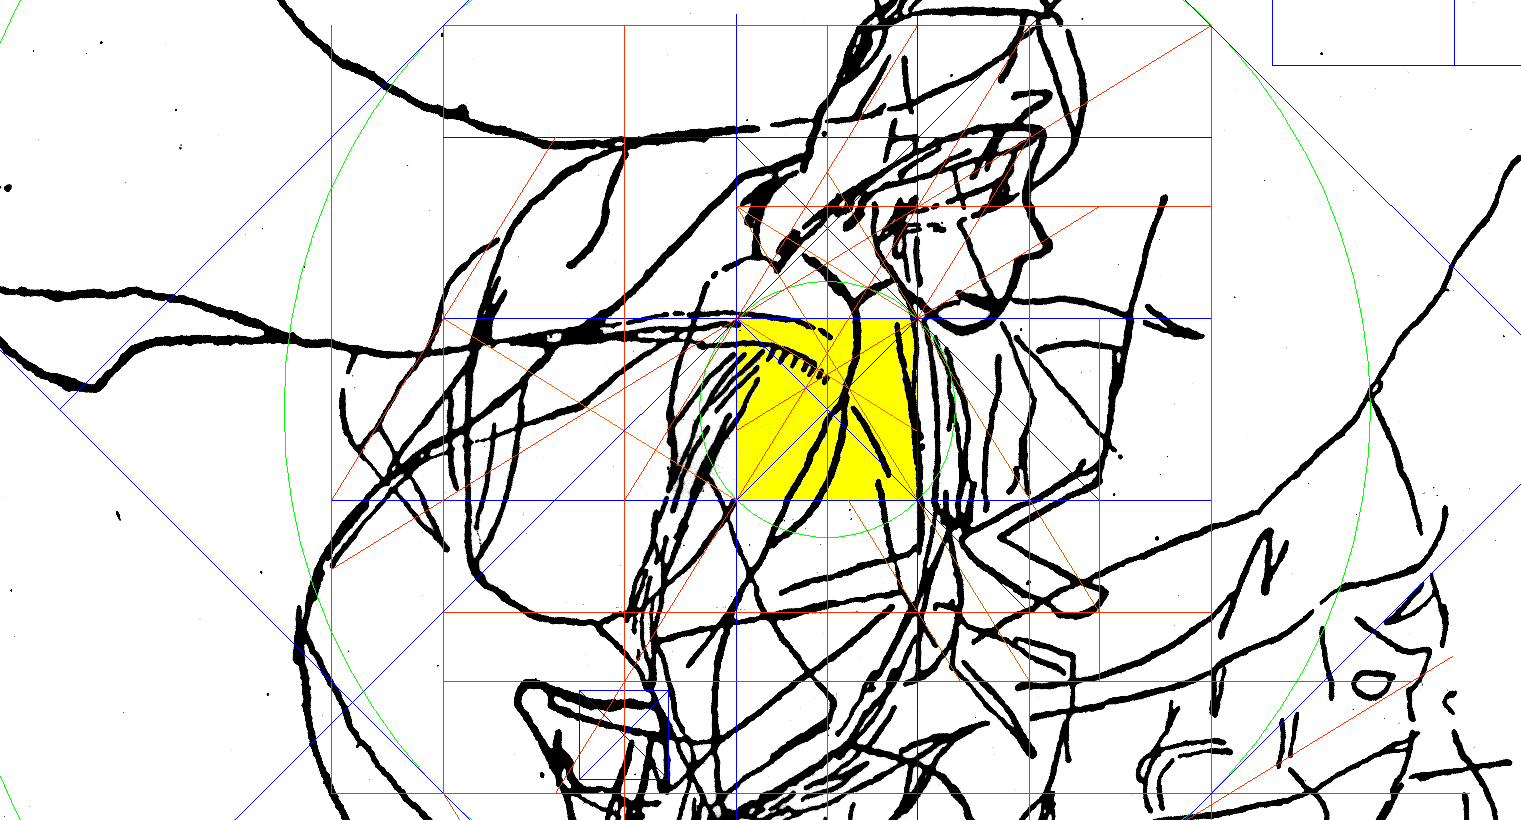
If we move the Third Pyramid (G3) straight down a little, it will then be limited by the engraving on three sides by what some say is a pocket; it is definitely interesting that G3 is that near to something offering it a custom fit. |
The Geometric Wonders of Athena's Head On some details of the same diagram: * The upper, the north side of the Great Pyramid is partially inserted into the head, and when extended, marks the entire edge of a straight engraved line. * Diagonal lines, one from the middle of the eastern side, and one through the pyramid's center, serve as accurate boundaries for the head. * Both pyramid circles (inscribed, circumscribed) neatly navigate their way into the head through narrow openings, and each leans on a couple of line-ends. |
All that is impressive, but frankly, not entirely satisfactory. Surely,
it would be better if the Great Pyramid was directly over
the head's area, and if its relationship with it were still more intense. Indeed, there was some temptation to experiment right away, as the pyramid could slide into the head as along a rail since there is that above-mentioned direct continuity of its upper side and the edge of engraved line. |
The Golden Column The diagram below is one of many possible products of the "13-step" construction method of the pentagram. The Golden Column, which is instrumental to the ground plan's reconstruction, is highlighted in color. Basically, it's a configuration of two golden rectangles _ an upright one (divided into a green golden-rectangle and a blue square), and a horizontal one (yellow). The column can also be divided into two upright golden rectangles with a square in between them, or simply, into four equal (not golden) rectangles, etc. ![]() In the diagram below, the pyramids are omitted in the interest of clarity. Two sets of four small circles, either yellow or purple, mark corners of two large overlapping golden rectangles on the Golden Column. The overlap is a square On each side of this square is a smaller upright golden rectangle. The blue circle marks the center of the column. The yellow tip of the Mother-star wedges into Athena's head symmetrically. |
A Snapshot When the Golden Column is divided by axes into four equal rectangles, the two on the right provide a nice snapshot of Athena's face. ![]() Athena's Portrait Adding an identical rectangle at the top produces a perfect fit with the top of Athena's hat (or helmet). The whole is now like a classic portrait. ![]() The Hatbox - Moving Rectangles to Better Fit the Head The top two rectangles of Athena's portrait can be shifted directly west to become a nearly perfect containing rectangle for Athena's hat/helmet - the Hatbox. All of the white space inside Athena's helmet is also inside the hatbox. ![]() During moving, some things in the head area are observed to align with precision to the angles set by the Mother-star. For instance, the green line is a truly precise limit for turns in the engraved lines - the nose, above the forehead, and the white space just before exiting at the top; this alignment is perfectly vertical. Like this, the hatbox, including the green line, would be truly useful in mapping Athena's head; unfortunately, we don't know its coordinates, because the hatbox got there by a free-hand move. The Great Pyramid is the factor making possible duplication of the above diagram by an exact method. |
Star-rays of Athena's Head a) The two antennae emanating from Athena's hat are rays from one of the original star's (Mother-star's) tips. The tip is at the center of the circle, which is very nicely fitted to the engraving itself. The long red line is the star axis leading to this tip. It is hard to see as it hides in engraved lines. |
b) Below - a closer view of how directions set by the Mother-star dominate the head area. Except for
the magenta line and one of the blue lines, all the others form star
angles. * The darker blue line is at 30 degrees to the horizontal. * Some golden triangles are in sight, too. * The circle centered in the tip of the star obviously belongs, as well. I count at least eight instances of engraved lines holding the circle in position. * Lines a,b,c,d,e,f in various mutual combinations all represent components of pentagrams/pentagons. |
The
"a" line combines two styles of line derivation: one type
follows edges of engraved lines; the second type sets ends of
(cuts off) engraved lines, or
limits turns in those lines. This line is especially impressive, as it
stays significant in a number of cases over a considerable distance. Line "g" to the left of "a" is a good example of the second type; four red arrows mark points of interest on it. Both lines are cast from a tip of the original star and hold 18 degrees between them, 72 and 54 degrees to the horizon. They are well identified. Now, what about the other lines like b, c, d, e, f? Is there a geometrical "raison d'etre" for those lines? the Star and the Head - More Harmony Diagram below: Five parallel lines at 18 degrees to the horizontal mark layers in Athena's face. Three of these originate from the star and one from the center of the Golden Column (marked by a blue circle). The origin of the top parallel, which passes through the top of Athena's forehead, is unknown for now, though it is a part of the system, obviously. That spot on her forehead must be of supreme importance, because virtually every major geometric figure encountered finds it somehow. Keep a tab on this spot, and you will witness this phenomemenon again and again. The contour of Athena's chin is a magnet for a number of lines yet to be shown. Another thing to see in this diagram - the engraved line passing through the Mother-star's center changes its direction there - from one of its star directions to another. The extension of one of the above-mentioned star lines forms an accurate lower limit of Athena's nose, while the other coincides with the head as it passes through. |
The
northern edge of the pyramid is hooked into a straight track in
the upper part of Athena's head. It lets the pyramid slide into the
head. In doing so, there is a moment when everything seems to click
into
place (see below). The definition of this move is simple: Move the pyramid westwards until the SW bound diagonal passes exactly through the star's tip. |
The
below digram
gives an even better view of the extraordinary
precision with which the engraving correlates to the given
geometry. Let's begin with the copy of the pyramid circle moved up
to exactly the 3/4 height of the pyramid's vertical axis. The yellow
arc of this
circle is seen to run within the engraved line of
the entire top of Athena's head for about a third of the circle's
circumference; it tests both engraved edges just microns
from breaking through to the other side. Admirably, it never
does.
The lower right of the same circle also nests on an engraved line,
just like its twin around the pyramid. Accuracy is also in effect in a number of other places in the digram. I've marked it by red arrows in some places, but there are other such places left unmarked here and in other diagrams, so readers should view the diagrams pro-actively. The inner pyramid circle is hemmed into place by lines on four sides, and it has some other points of accurate contact. |
![]() |
Moving the pyramid into its new location also explains how to move the Hat-box by an exact method: The pyramid's inner circle is given an inscribed pentagram. Thereupon, it is seen that the south-west bound diagonal of the hand-moved Hat-box passes through the mid-point of the star's horizontal arm, which means that the Hat-box move now stands defined. ![]() Afterwards, reduce the Hat-box to the west until it becomes square (magenta lines in the diagram below). Simultaneously, the eastern side ("a") of the square becomes one with the previously observed perfect vertical alignment of points at the front of Athena's head. This two-move combination is elegant in its simplicity, and it is a major success on the way to proving that my approach to the analysis is correct. Moreover, expanding the Hat-box into a larger square also creates a discernible boundary on the head (line "b"). Also worth noting is that two lines, one of the star and one of the associated pentagon, run from the top of the forehead (third-eye?) down to the tip of Athena's nose, all the while remaining entirely inside the engraved lines. Importance of the top of the forehead as a major hub, extrapolated from the frequency with which various geometric lines seek it out, was already mentioned here. Perfectly Balanced For more testing, let's use the traditional method of enclosing objects in rectangles. Here, we start with lines 'a' 'b' 'c' and complete these into a square. Add axes and diagonals. .. ... ![]() Now we see that symmetry-wise, 'closing the CD tray' was an ideally precise move, because the vertical axis of the square of the Great Pyramid is now one with the vertical diagonal of the enclosing square. This kind of accuracy in transfering exact designs onto quartz or limestone medium demands the use of advanced technology. Considering that there was another stage of copying the original engraving and then copying the copy until its appearance on these pages, obviously, there was very little distortion from what's likely to be space-age accuracy of the original. _____________________________________________________________________ ![]() Above: in a variation on the same type of experiment we get the same result. X is a diagonal in one square and a central axis in the other square! In this case, we can see some thickening where the two lines lay side by side; however, taking the magnification into account, the precision is still very good. |
Below: With the Great Pyramid inside Athena's head, suddenly, it is seen why some significantly oriented engraved lines are where they are. They are in sync with secondary elements of the pyramid, such as the inscribed and circumscribed circles, or pentagrams. The accuracy of these ideas stands out; it is simply impeccable. |
1) Line 'a', we remember, originates from the
tip of our 'mother-star'; It runs along the left edge of
an engraved line, the antenna. The pyramid's outer circle is itself the inner circle of a pentagon: 2) Line 'b' is a side of this pentagon. It coincides for some distance with the right edge of a helmet line. 3) Line 'c' is then a side of the star inscribed into this pentagon. It runs parallel to 'a' on the other side of the same engraved line. 4) Line 'd' is the pyramid's northern side . 5) Line 'g' is of the aforementioned pentagram. Intersection of 'g' with the pyramid's inner circle then creates a point on line 'e' which we make parallel to 'a'. 6) Line 'f' is also parallel to 'a' and a tangent to the inner circle of the pyramid. Like 'a' and 'c', lines 'e' and 'f' also work in tandem to give us both edges of an engraved line. Below: Line 'a' and a line of the red pentagon meet nearly at the end of the engraved 'antenna' line. The pentagon line then passes right through this end, an important bit of information for the objective of reconstructing the thirteen points of the 'Frame'. Also in this diagram, the line 'a' was mirrored across the vertical axis of the pyramid. The result shows the symmetry of 'a' with engraved lines across the axis. ![]() |
Below: The two stars inscribed in pentagons, especially the golden one, help us pin-point various locations on the head. The level arrow points to one example of it - a line of the golden star is a perfect tangent to the tip of the forehead. The upright arrow marks another such perfect tangent to the gap in Athena's helmet/hat. Other instances of order here were left unmarked, and can be found upon a closer inspection. |
The
above diagram shows the basic idea of the star configuration below -
the top of the star is at the top of the pyramid's outer circle - the
bottom tips rest on the bottom side of the pyramid . Below: Arrows mark places showing with what extraordinary accuracy the engraving forms a union with the geometry. * The pentagon at the junction of "j" and "k" lines describes the end of an engraved line. Line "k" then describes the engraved line itself. * The top two arrows draw attention to pentagon lines limiting the reach of the white space in that direction. * The next arrow points downwards to where two star lines meet at the edge of an engraved line _ another bit of accurate data for mapping the image. * Next down are two arrows point to star lines limiting the reach of the white space. * The next arrow down points to where the line "g" accurately follows the edge of an engraved line for some distance. * The junction of lines "g" and 'm' marks a junction of two engraved lines. * The arrow at the tip of Athena's nose points to where the line "h" forms a super-accurate limit for the reach of white space in that direction. * The last arrow down on the left shows yet another perfect limit. Blueprint _ the exact width of Athena's helmet at 36 degrees * Between them, the parallel lines ''g' and 'w' give us the exact width of Athena's helmet at the angle of 36 degrees to the horizon. With regards to the head, this diagram seems particularly instructive although not all of the order therein is shown. |
Athena's Star-spangled Head _ the Star Crown The star configuration below is defined by the lines 'b', 'c', 's', and 'e', where the intersection of 'b' and 'c' is the origin point for lines '1' and 's'. Line 'e' is parallel to 'c' and originates from the point at which line '1' crosses the inner circle of the pyramid. The star-crown on Athena's head also helps to locate the end-point of the left antenna-like line above the helmet. |
Below, the star configuration from the preceding diagram
is expanded over the whole engraving. A slew of harmonious correlations between the two is on display here. |
Below: Another interesting configuration. It is defined by the already known lines pointed to by arrows. |
Athena's Head, the Pyramid's Base and Golden Rectangles The square of the pyramid in Athena's head can be transformed into corresponding golden rectangles, larger and smaller. The diagram below is an example of that. A golden rectangle, whose longer side equals the pyramid's side, has been attached to the west and south of the pyramid, and the whole was completed into the large square. The square of the pyramid has also been divided into golden proportions,; the resulting formation is what I call a "Golden Cross." Extension of some of the lines then creates a golden cross for the entire big square, as well. The benefits are as usual; we learn more about how to locate engraved lines with utmost accuracy by exact geometric procedures. For instance, the western side of the big square courses as one with the outer edge of the head's westernmost vertical line. This is also just a hair off the Hat-box's western side (reviewd earlier). There are other instances of order here, and I'll leave it up to the reader to find them in the diagram. |
Preliminary Conclusions Moving the Great Pyramid configuration from its original location to the area of Athena's head proves to be tremendously instructive with regard to the head's structure and design ideas. Without this move, an accurate and detailed reconstruction of the head would be impossible. The astonishing productivity of moving the pyramid proves the objective existence of this part of the Giza groundplan to also be part of Athena. the Second Pyramid The Great Pyramid was moved into the head area, and the move paid off handsomely. Therefore, we should try the same move with the Second Pyramid. If the pyramid conforms to the head similarly to how the Great Pyramid does it _ then the validity of the insinuation therein will increase exponentially - Athena's head/mind controls both; it controls the Giza plan. ...........................A Surprise a) The move immediately reveals that Athena's face is just as wide as the Second Pyramid. This result is obviously extremely accurate. b) Next, thing learned is that the head's height equals two times the pyramid's side; when the measurement starts from inside the line at the bottom of Athena's chin, it reaches the middle of the head's top line. |
A Sphinx Symbol? Using a bit of imagination, the westwards elongation of the head makes the whole look Sphinx-like - an interesting impression since the Giza Sphinx is situated in front of the Second Pyramid. Also, the pyramid's square base is a good fit between the horizontal lines at the back of this Sphinx. Optically Exact Placement We can place the Second Pyramid on the face with optical precision by using the line edges at its right and bottom. |
Positioning the
south side of the pyramid from the lowest point of the face by hand, and
placing two upright golden rectangles over its north side gives a
rectangle whose top follows the top edge of the highest placed straight
line in Athena's head. It is the same engraved line, whose lower edge is
followed by the north side of the Great Pyramid. Expand the G2's square westwards into a golden rectangle. The rectangle's western side locates the exact western reach of the white space in Athena's hat/helmet. Other lines in this grid provide positional information for elements of the image, which would be useful if we could derive them from the geometrical system. The diagram below is a reminder of how we located the line 'a' in a previous experiment described near the top of this chapter. We use this method in the placement of the Second Pyramid across Athena's face. |
![]()
|
A more detailed diagram lelow also includes some golden diagonals stemming from the square of the pyramid. One of these diagonals passes directly through the tip of Athena's forehead, a place that comes to our attention repeatedly. Here, this spot is also bounded by the corner of a small golden rectangle. |
Order seems to follow extension of this particular Golden-cross grid to the area shown below. Lines 'a' and 'x' are especially impressive in how faithfully each follows an edge of a given engraved line; then travel over white space; then find the edge of another line. Moreover, line 'a' also reproduces the exact perpendicular angle of the Mother-star system. Unlike the other lines, 'x' is not part of the grid by its orientation; however, it is a perfect example of perfection unattainable without the use of at least a straightedge. Imagine yourself trying to emulate such workmanship using an engraving tool made out of flint. Mission impossible. On the nature of engraved lines Stéphane Lwoff and his team took great care in producing a copy of this engraving. As the result, we have faithful reproductions of the engraved lines themselves - not only one-dimensional lines, but the two dimensional ones. The best example of this is Athena's nose. On the inside, the line is beautifully smooth and smoothly curved. It is a pretty nose. On the outside, it appears much rougher, but the crucial difference is in that it, the line, is angular. Such appearance would be mission impossible if the line were to be made by a single motion of the engraving tool. Ergo, we have a proof that each line edge was engraved separately. Does this fact fit the conventional theory of a method by which more than 1,500 engravings had been made at the La Marche shelter? Hypothetically, the lines are not only two-dimensional, but three-dimensional. There is a possibility that using the latest technology like lasers, the image could be played like a DVD. |
The reader may recall the diagram below from the preceding
chapter. The golden-cross/square derived from the Second Pyramid is
nearly the same size-wise
as the golden-cross within the containing square of the Giza pyramids. This fascinating
fact, seen when the two are made concentric, was one of several indicating the Golden Section as possibly
seminal to the Giza ground plan. |
I had found no use for this pattern in the plan's reconstruction. Its time to shine comes upon its merger with the engraving. That's when its harmonious coexistence with Athena's head becomes manifest (diagram
below); therefore, this pattern should be useful in image reconstruction from the plan; . The order between the marked lines and the image is extensive and would require a lengthy description. Luckily, it is so clear that using arrows does the job, too. Allow me just a couple comments: a) line 'a' is obviously planned as it integrates into the engraving in a number of places. b) the golden diagonal 'e' literally threads the eye of a needle at the spot marked by arrow-1 (a further magnification added in a separate digram below). The point where it crosses the square's diagonal is marked in blue. This point will be shown as instrumental to the head's mapping, while also positioning the Second Pyramid over it. |
The Stars Shine Brightly The star inscribed into the Great Pyramid's inner circle (diag. above) is the key to placing the Second Pyramid so it covers the face width. The method was described earlier in this chapter. To place the south side of the Second Pyramid at the lowest point of the face, we have to combine information from more than one source: a) the Square's golden circle inscribed with a star and centered in the Square's corner inside Athena's face One arm of this star is a very accurate limit to Athena's chin from below (diag). ![]() |
One
tip of the above star is shockingly well positioned un Athena's
forehead. The harmony between the head and the star in this
position is simply indisputible. Yet, as is, the star's lines fanning out from the
tip of the forehead do not share the angles of engraved lines there.
They conform to the Square. Below: But, the same star lines reoriented to the Mother-star do conform, rather perfectly, to the engraving. |
Below: The Second Pyramid centered in the center of Pyramid Square/golden cross is the other element needed to locate the bottom of Athena's chin. The Mother-star's yellow inner star also vies to fulfil the same role. |
The green-colored line 'b' is the extension of
one of the yellow star's sides; The purple-colored line 'd' originates from 'D', the intersection of two major diagonals of the Second Pyramid (one golden), and runs parallel above line 'b' at 18 degrees to the horizontal; It comes as close to the chin's edge as can be. Therefore, it is the line selected to combine with line 'c' to give the insertion point for the horizontal limit to the chin. a Micron Line 'a' passes 0.00006799 unit above the point 'S'. In the engraving's lifesize, it translates to 1.36 thousandths of a millimeter. Both 'a' and 'b' connect the yellow star to the other relevant figures in this positiion. |
The magnification above shows that no matter which line combination we chose, the end result - the two blue lines - is practically the same; and it's hard to decide which of the two is closer to the true limit. |
There
is a fundamental difference between a simple observation as to how well
each pyramid fits over some part of the engraving, and knowing how it
got into that position by an exact method. Now, finally, the Second
Pyramid's impressively well fitted position over Athena's face stands
explained rationally, as well. The Second Pyramid has at once three significant positions in the engraving's context. Each position is an exact construct whose origin can be traced all the way back to the Mother-star. Each position is significant, because it provides additional descriptive information about the engraving itself. Objection: The notion of moving pyramids is utter nonsense; the Giza pyramids are ginormous immovable objects! Yes, but these pyramids, their blueprint, that's just a very small part of the Athena-engraving; and I have been noticing from the very beginning of my analysis that the engraving represents a dynamic design. By the way, each pyramid seems attached to a monorail; and moving the Great Pyramid along this predetermined vector has led to extremely valuable insights. It will also be seen that such a move along its monorail tucks the Third Pyramid all the way into a well fitting pocket of Athena. Moreover, the Second Pyramid, after its move to the center of the Pyramid Square, also remains attached to its own monorail despite shifting sideways slightly. |
The Third Pyramid The square pyramid base falls into what Lwoff and others see as a pocket, a part of Athena's attire. It is an interesting densely engraved area of the image. The right side of the pyramid runs for some distance along the edge of an engraved line, thus matching the other two pyramids in that aspect. ![]() | The "pocket" could be custom-tailored to carry the pyramid, because shifting the pyramid just a little shows that it fits there closely. The two red arrows pointing to the pyramid show that when the bottom side of the pyramid limits the reach of the white space in the small pocket where the arrow is located, then the top side does the same - see the arrow there. A sign of what's in store? - The double red line on the left has the exact angle of a golden diagonal, and it fits the image perfectly: On the inside, it fits a line edge; on the outside, the higher arrow points to where it limits the black line, while the lower arrow points to where the line limits the white space. ![]() A whole lot goes on in the diagram below: 1) There is just one position where all four corners of the pyramid are in the black, while its sides still keep to the engraved lines. 2) All the color lines here have non-random angles: the green lines have golden diagonal angles the yellow lines hold pentagonal angles with each other (18, 36, 72, 90 degrees) the longest yellow line is twice a perfect limit at the top the steeper red line is actually one of the Square's diagonals the center of the small circle marks one of the Square's corners the triple red lines hold 90 degrees to the Square's diagonal ![]() Below: Arrows point to seven instances where the red lines of the inscribed pentagram/pentagons of the circle inscribed in the pyramid base form totally accurate limits for either the black lines or white spaces. The part of the cyan line 'd' inside the circle is one of the sides of an inscribed hexagon. ,,,,,,,,,,,,,,,, ![]() | * Below: a wider view, and a whole lot of lines that are non-random with respect to the pyramid orientation. S1 and S2 are two adjacent corners of the Square; the red line between them is a side of the Square. Line 'c' holds the same angle with the horizontal as that side of the Square. Given one of these lines on a sphere, rotating the sphere 180 degrees around its polar axis would make this line appear like the other line from our point of view, i.e. it would rise to the left. An interesting twist: lines meeting at S1 are oriented to the Square, but those meeting at S2 are oriented to the Mother-star. This phenomenon emphasises the interconnectedness between the Mother-star and the Square systems. All the lines marked 'a' are oriented 18 degrees to the horizontal. All the yellow lines hold one of the following non-random angles:18, 45, 63, 72, 90, 108 degrees. The two lines 'd' share the same angle which is belongs to the 7-pointed star. The green lines represent three of the four possible golden diagonal orientations in this pyramid's angle system. |
.................................................Consistency The top of the colored-in stars is anchored in the same intersection of engraved lines as yet another corner of the Square (S3). Aptly, the center of our Mother-star is a little higher left on the same line, approximately where this line turns. We know from before that both directions express Mother-star angles. The star pattern in the image conforms to the same angles. We see engraved lines conform to the star pattern! Thus, there are two corners of the Square where the engraved lines express Mother-star angles. And just to make sure there is no mistaking the intent on the designer side, there is also a corner expressing angles of the square (S1). These two corners were the ones I had noticed first (in 1985), due to the by now justified speculation that the engraved Xs are there to mark centers of circles whose arcs then form the rough lens of Athena's torso. ............................. ![]() |
Below: Because the area of the Third Pyramid abounds in golden diagonals, this pyramid is expanded into a golden rectangle experimentally. I'll refer to this rectangle as the G3-original golden rectangle, the origin of more golden rectangles in this position. This rectangle helps to clarify the positions of vertical engraved lines (c,d,e,f) below it; when a copy of the first golden rectangle is added there (below). The three arrows inside the added rectangle point to three instances in-a-row where the golden diagonal '1', rising from the lower left corner of the added rectangle, forms perfect limits for the engraving. Check-points Such points are like control posts, or check-points, showing that lines are on their intended course. The line rising from the same corner at 45 degrees also has such a check-point; the line is a limit to an engraved line. |
..................................Blueprint Quality The two stacked golden rectangles represent half of a larger golden rectangle, so we expand their shape into that rectangle - the large golden rectangle in the diagram below - the G3-original golden rectangle quadrupled. It was a pleasant surprise to see two of the previously identified golden diagonals pass directly, with consummate precision, through the right side corners of the large golden rectangle. With the exception of but a couple lines, all the other system-lines showing in the right half of the larger rectangle correspond to the image in one way or another. |
Below: Double the large rectangle as shown below, and the same visual effect carries over into the right upper corner of the new shape. Although the engraved line under 'c' is curved, 'c' remains entirely inside the curve. It's as if 'c' was the hard core of a wire whose outer jacket was deformed by heat, and a piece broke off but is still holding onto the wire. This quaint notion is somewhat upheld by two lines to the right side, bearing accurately at the golden angle once again. The golden line 'f' is a major system line in the quadrupled G3-golden rectangle, because it originates from the point where 'x' intersects the golden line '2'. Line 'x' divides that rectangle into a square and a smaller golden rectangle. The way 'f' coincides with the straight section of the left edge of the engraved line is attention-worthy by its utter perfection. It joins the already impressive array of the other golden lines in the area, which are all part of the Third Pyramid's golden rectangle system. |
Extend the quadrupled G3-golden rectangle by two more such rectangles to the right. This step explains the position of some of the lines we have noticed before. For instance, the vertical line 'h' rises from the intersection of two golden diagonals ('f' and 'g') of the middle rectangle and runs along the edge of engraved line, where we find one of the Square's corners. Lines 'a' and 'b' give 'c'. 'c' and 'd' give an insertion point for 'e'. 'e' and 'a' give an insertion point for the vertical magenta line to the left of 'h'. That line runs on top of an engraved line and also marks out a little magenta colored square. All four corners of the middle rectangle are in the black. The last rectangle on the right doesn't contain many engraved lines; nevertheless, close observation of these lines shows high degree of their compliance with the rectangle. |
Even Units Two major lines derived from the G3-golden rectangle, 'j' and 'k', meet at a checkpoint in the engraving. From there it is 0.33387356 unit to line-2, the bottom of a golden rectangle, less than a thousandth. A long engraved line bounces between lines '1' and '2'; and creates two horizontal levels. Another third of a unit up, the engraving has a line concurrent with line '3' over its entire modest meandering. And again, another third of a unit up, the engraing sheathes line-4. Four times, the engraving matches the geometry to show its unit. a nested unit circle A unit circle was drawn from the center of the rectangle on ther right. It is visibly nesting in the engraving, I can see at least eight locations supporting the idea. Judging from the evidence seen this far, the Third Pyramid wields a large influence over the lower region of the engraving. |
Conclusion There has to be a threshhold past which the quantity of accumulated evidence metamorphoses into hard proof. I believe that to be the case in the present chapter. It is a given that the Giza siteplan is incorporated in the Athena engraving. Therefore, the Giza siteplan is at least as old as the Athena Engraving. Could the Giza pyramids themselves be as old? It is self-evident that the Giza pyramids were in all likelihood built under the supervision of the "Agency", the agency behind the Athena Engraving and the Nazca Monkey. The Agency itself must be just the tip of an iceberg - a highly advanced prehistoric civilisation - of this planet or not. Is the Agency still active? If so, exactly how does it intervene in humanity's affairs? © Jiří Mrůzek Vancouver, B.C. August 30, 2013 Last edited April 9, 2021 |
A look in the rear view mirror. The Great Pyramid is the key to unlocking design secrets of Athena's head. The Second Pyramid is also a major contributor to that goal. Both are direct products of the Mother-star (the Cone). In addition, this study brings forth a number of instances in which products of the Square also participate in the order of Athena's head. However, the Great Pyramid remains the dominant factor. And then there are those five-pointed stars (pentagrams) which are like crowns upon Athena's head. It's hardly wrong to presume that in all the world's languages to say that something is in somebody's head is synonymous to saying that it is on someone's mind. Athena's mind is clearly preoccupied by advanced geometric concepts. The Great Pyramid's positioning in the upper half of the head is symbolic - the pyramid in union with the mind of Athena - Giza's architectress. |
Previous | The Abydos Helicopter | Giza Pyramid Temples & the Golden Section | Hesire's Tomb Door |
Top | The Nazca Monkey Report | A Prehistoric Rider | Discovering Geometry in Stone Age Art |
Next - Testing the Nazca Monkey for Connections to the Great Pyramid |