| Nazca Monkey & the Seal of Atlantis |
| "..the
figures with their beautiful and regular curves, which
could only have been produced in these giant sizes if
every piece, being part of a circle, had a radius and a
centre whose length and exact position were carefully
laid out." (Maria Reiche on Nazca) The Geometric Nature of Nazca There was a sense of familiarity at the very first sight of the Nazca Monkey's, because by that time I was on the path to solving the Athena-engraving — a different edition of the same puzzle. Solving geometry of the Nazca Monkey was then elementary. The Nazca-monkey is a masterpiece of Science-Art derived from a sophisticated exact design. Any scholar seriously addressing analysis of the monkey's design should become alerted to the fact by the unsurpassable accuracy of the transfer of that design onto the desert floor — readily evident from its set of straight lines related by visually perfect whole degree angles. The fact that most of these angles are also found on a regular 5-pointed star holds out a promise of interesting developments ahead. Yet, in spite of all these geometric clues, by itself, the monkey is practically unsolvable, because as a puzzle, it is incomplete. The clue for a basic solution to the monkey glyph is given half the world away, on an engraved stone tablet almost 15,000 years old. It was found in 1937 by Leon Péricard, along with a trove of fifteen-hundred other engravings. The stones were buried under the earthen floor of the grotto of La Marche located near the town of Lussac-les Châteaux in southern France. Before being converted into a wine cellar, it served as a shelter to many prehistoric generations. I said "basic solution". For a much more complete solution, we have to unite three elements: the Nazca Monkey, the engraving from La Marche, and the ground plan of Giza's three great pyramids. The Athena-engraving, as I call it, is a whole lot more complex than the monkey, but it is designed upon the same template. As a puzzle, it comes with a complete set of clues to the presence of two seminal figures, a first-generation 5-pointed star, and a second-generation Square. Yet, one crucial clue seems to be missing from the engraving, or else is very low under the radar, but it looms large in the monkey — a unique way to construct the pentagram. Checking out the engraving for the same motif is a shocking surprise. It has a very, very large presence there, and I was missing it all on account of being clueless (pun intended). Eventually, I saw reasons to try this method as the geometric basis for a reconstruction of the Giza ground plan. With the addition of some external inputs, I've managed an exact reconstruction of Petrie's Giza plan to the tenth of an inch. Next, having united the Giza plan with Athena and the monkey brought out a lot of new insights into the construction of both, and cemented the certainty that the three are one greater whole. Long range prospects Maria Reiche makes a key observation: The monkey drawing has a stem which, almost a mile long, leads into a hub of lines at the edge of the pampa. So, there is a clear physical connection between the supposedly unrelated figures and the lines (the animal and plant figures are generally attributed to the older pre-Nazcan people of the Paracas culture). This connection implies that the monkey is an integral part of the vast grand-design of Nazca. Similarly, the Athena-engraving is just one of some 1,500 engravings found at La Marche. Therefore, the two sites may very well be awaiting reunification and processing as one whole. One's mind reels at the prospects. . The Nazca Lines should be mapped (scanned) by the best means at our disposal to assure total accuracy. The same goes for the engravings from La Marche. The volume of data would be overwhelming for human teams, but the data could be trusted to AI trained to recognize geometric and other mathematical coding. . In terms of sheer complexity, Nazca Monkey does not begin to compare to Athena; therefore, its main ideas stand out more. Its most emphatically stated idea focuses on a particular method of constructing the regular 5-pointed star (as far as I know, it is the second quickest such construction, as it only takes thirteen steps). Although sophisticated, the idea is no rocket-science. A whiff of rocket-fuel, however, does come from seeing the same idea accurately mirrored in the Athena-engraving. Then it is also essential to a perfectly accurate recreation of the layout of Giza pyramids (as surveyed by Petrie) from scratch. Prerequisite knowledge gained from the Athena-engraving was key to understanding the design of the Nazca Monkey, which, in turn, contributes to the combined prerequisite knowledge necessary to understanding Giza's ground plan. The Circle Closes I had to go back and check whether I had missed out on the Giza plan in both Athena and the monkey. It was well worth the effort. The plan has a large presence in the Athena-engraving. The Great and Second pyramids directly relate to Athena's head to a must-see-to-believe degree. Head and mind are synonymous words In most, if not all, languages. Therefore, the Giza plan, and mathematics in general, are foremost on Athena's mind. In fact, the engraving seems to be telling us that she was Giza's architect. Furthermore, is there any deeper significance here? Broadly speaking, the ancients may be coding in some insights on the make up and functioning of the human brain. One way or another, it is indisputable that the Giza plan is at least as old as the engraving, though the question remains on when exactly the plan was implemented. There is an ongoing heated discussion on that subject. A Big Question What mysterious agency looms behind this paradigmatic global wonder of ancient sites mirroring each other's ideas? Perhaps, an adequately great effort at analysis of all the materials at our disposal will provide the answer, but for now, the single capitalized word "Agency" seems adequate. Its great powers are clearly evident — over the span of 13,000 years or so, the Agency had left its inimitable signature at La Marche, Nazca, and Giza - opening the possibility of also being involved in numerous other historical enigmas. Cognitive Dissonance.. Should objective and competent mathematicians be tasked with a full review of my research results, they would validate it. They would be compelled to do so because the evidence is voluminous and tangible. Complex and sophisticated designs correspond physically with artifacts. . The present day academia, dominated by dogmatic historians and archaeologists, already has a magic formula for handling hot potatoes like the one I served it; it relies on a gross distortion of the scope of "apophenia" and "pareidolia". It proposes that significant geometric or mathematical order can be found practically everywhere, in any random collections of lines, points, ancient art, cloud formations, and so on. The doctrine is clearly misleading and logically deficient; it fails to acknowledge criteria which enable us to distinguish naturally occurring patterns from willfully implemented order. That such criteria must exist is self-evident. When it is impossible to deny what is in full view, the only way out is not to look — to don the doctrinal blindfolds. This is sometimes called "cognitive dissonance". |
|
"The monkey and surroundings would be an appropriate subject for a special study, as it is a complete unit and the pursuit of each line to its origin does not, as at the border of the pampa, lead unendingly from one thing to another." Reiche never
did carry out that special study..
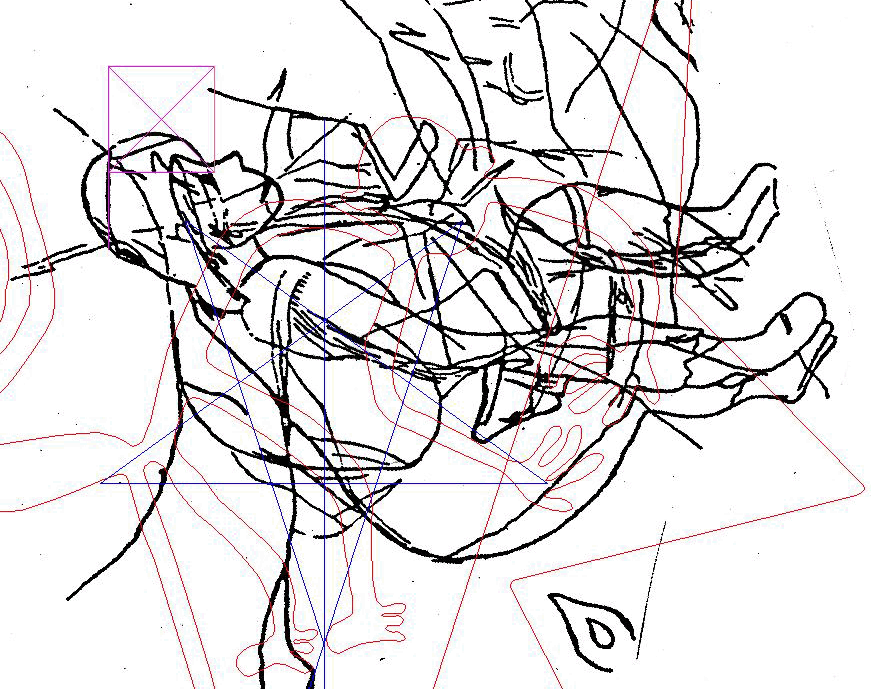
1) two long straight lines form a big X-shape; the horizontal red line shows perfect alignment along the bases of the tail and the hands, and the tops of the sixteen lines forming a grill shape. 2) the monkey looks like an equilibrist balanced on the vertical axis of symmetry of the big X. Evidently, standing tall like this is one persuasively reasonable orientation for the monkey . Shown later, there is another strong alignment in the monkey's figure — in which the dextrous monkey performs a geometrical pantomime to the cardinal points. . I believe that Maria Reiche could not possibly miss these two alignments. So, why did she not mention them specifically? My guess is that since she had no chance of learning of the causal connection between them, there was no urgency in going into specifics. In contrast to the Athena-engraving, the Square which is behind the cardinal alignments is itself effectively invisible in the monkey. Testing in CAD After importing the digitized image into CAD, I positioned straight lines over the ground lines 'a' and 'b' the best I could and then measured the angle. It was 36.02° — optically perfect for a 5-pointed star.  |

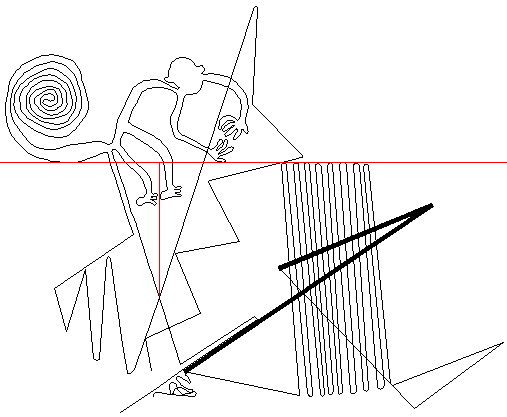

| Science-Art Since the two lines forming the Big X hold the angle of visually perfect 36°, ten of these angles side by side will form a perfect circle. This results in the above chain of ten monkeys. The tail snugly coils around the head, while the hands grip the torso with calculated effect. Clearly, I'm not the author of this amazing scene; I'm its finder Ditto, for the next three images. |

|
Another visual proof
that the angle of the Big X is 36° |


| Above we have
two identical instances of the monkey glyph mirrored
across the central axis of the Big-X. The top instance
seems meant to imply a hooded male figure, and the
upside-down one a female figure seen from the back. |
| Maria
Reiche's book written simultaneously in three languages: Geheimnis
der Wüste — Mystery on the desert — Secreto de la pampa
is now a collector's item. I bought it online and did my
own tracing of the Monkey from the photograph in the book.
Now I had three tracing versions, and all were different. Most importantly, in Reiche's tracing, the angle between the cone sides is 36,5°, so the more accurate star angle in the digitized version, the first version I worked with, must have been sheer luck. |
monoraw.png

| Undeniably,
after all those years of being available to public
scrutiny, the Nazca Monkey Report seems dead in the water.
I don't quite see why, since it sticks to standard, down
to earth methods; therefore, its results are hardly
invalid. But, could it be that the image version I had was an unreliable witness on account of being grossly distorted, and everybody else knew that I'm out of touch with reality? I'd never think so because its testimony led to major progress in the analysis of one Stone Age engraving from France, and of the Giza ground plan — and, in the end, the three subjects of study merge seamlessly into one great masterpiece. That fact suggests that my old Nazca Monkey Report is fundamentally correct. |
| We can clarify
the issue once we have the photograph of the monkey
drawing in CAD and photo editing programs — Overlaying of
the old vectorial version of the monkey glyph over
Reiche's photograph had exposed surprising sloppiness by
the CAD service I paid for the job. Luckily, the
distortion wasn't so great as to cover up the essential
ideas, the fact that the monkey encodes exact geometric
ideas. In contrast, there seems to be next-to-none distortion in the actual photograph in relation to the underlying exact ideas. It exposes the excellence in transferring the design onto the desert, and a remarkable durability of the glyph which is officially almost two-thousand years old but could also be much older, as old as the pyramids or the Athena Engraving. Proof of concept (diagram below) The CAD line 'a' sticks to the ground line 'a' perfectly over its entire course; so, let's use it as our basic orientation setting line... However, 'b' is another story. The CAD line 'b' inserted at 36° to 'a' where the ground lines cross at 'X' — sticks to the ground line 'b' for most of the way, but once it reaches the hands area, the ground line starts veering off to the outside. That's why the line deviates from the whole angle of 36° in tracings, Reiche's and mine — by being clamped to both its ends in order to produce a straight line. Moving on from 'b', it is most illuminating to see the adherence of other lines to the whole angle principle. . Five ground lines in a row after 'b' —'i' 'e' 'f' 'g' 'h' — are all beautifully accurate placeholders for CAD lines at exact whole angles with 'a': Line 'c' holds the star angle of 72° with 'a'. Line 'e' holds the angle of 45° with the central axis of the cone a-b, The angle held by the same line 'e' with 'f' is the 60° found on the equilateral triangle. The next apex to the right of 'e'-'f', the angle 'g'-'h', repeats the 72° star angle between 'a' and 'c'. <https://i.imgur.com/5Hnc2dx.png> <moncone9.png> |

Big X — the Key to the Secret in Plain View , The key to the secret of the image is the angle between lines 'a' and 'b'. The X-shape given by the two lines is named 'X-tree', or 'Big-X'. Once I had the digitized image in CAD, I drew straight lines over 'a' and 'b', the best I could; and then measured the angle. It was 36.02° — optically perfect for a 5-pointed star. So, the Big-X may be seen as two tips of 5-pointed stars in a symmetric tip-to-tip alignment. Just like in the Athena Engraving, here was the same cone — twice, this time. So, just like in the Engraving — was there a star or stars to fit over it? If so, then what size? |

| First-star — the pentagram
below the X-point Line 'c' runs along an edge of the second longest straight ground line of the glyph and cuts across the extended line 'a'. ('a' and 'b' are reversed in this old diagram) 1) Let this cut set the size of the experimental star below the X-point. 2) Mirror this star above the X-point, then repeat the move to get the diagram below. The star inside the big star is remarkably well centered upon the monkey. The entire star pattern is well fitted to the Big-X. <https://i.imgur.com/53Vfp29.gif x-stars.gif> |
| The same method of setting the
star size is repeated in the image below. The
same line 'c', which sets the star sizes of the Big-X,
also sets visually exact 60°angles with most lines of
the
grid of the sixteen parallel lines
(a few of the sixteen are off
several tenths of a degree). An equilateral triangle is based on 'c' and the green parallel grid lines. These lines correspond to an internal division of the triangle into smaller triangles. <https://i.imgur.com/vSZpnsJ.png monstori.png> |

The pattern

The Big-X and the line 'c' set up the above classical pattern.
https://i.imgur.com/k3dTtO1.png moncone.png>
| Below: Our method leads to the best possible result in the upper section of the double cone: the red arrow points to where the circle around the big star touches the outer edge of the line of the Big-X — exactly where it turns back. The red-blue star over the monkey's body is the Mother Star; the yellow star is the Monkey-star. . So far, the photographic version comes across as more accurate than the old digitized tracing. . (The reader must forgive me for assigning the 'c' label to a different line in some diagrams.) <https://i.imgur.com/g0N0qBI.png moncone5.png> |
|


| With the digitized tracing, if we
set the size of the big pentagram from the height of the
Big-X above the X-point, and superpose it over the
pentagram set by the line 'c', it looks like the diagram
above. There is a tiny separation between the respective
stars and their outer circles; the perfection from the
previous (photographic)
diagram is missing. |

| Below: While the (yellow) Monkey-star's tips are all on the outside of the monkey's body, four tips of the Mother-star are seen stationed in or at the monkey's body — head; hands; feet; and tail. |

|
the 60° Grill Another look at the sixteen parallel lines, forming a grill-like pattern on the right of the glyph, averaging 60° with the long line crossing the grill near its middle. If expanded into a system of equilateral triangles as in the diagram below, an extensive geometric harmony is established between that system and the system of 5-pointed stars. This harmony really catches the eye because of how good it looks at this magnification, leaving no doubt about its planned nature. |

| Does the
monkey's Mother Star really show the handwriting of Athena
Engraving? Should the monkey share another geometric
specialty with Athena
— the Triplet Circles, without which its
Cone would be far more difficult to decipher —
the likelihood of a direct connection between Athena and
the monkey would skyrocket... (the Triplet Circles are so
named due to appearing identical in size) The reappearance of the Triplet Circles in addition to the seminal Cone (Big-X) drew a prospect that the entire concept of Athena's Cone & Square might be at play here. So, I looked for the Triplet Circles around the drawing . The diagram below shows how one of those circles, the inner circle of the Mother Star, looks custom fitted to three key areas of the monkey — the hands, the feet, and the head, although indirectly. It's the circle's inscribed pentagon that fits the head. The Monkey's Head, Hands, and Feet Standardize on the Mother-star's inner-circle  In the old, digitized file (above), the inner-circle fits both the hands and feet to within three millimeters on each side... Likewise, the same circles fit nicely in the photographic version. |

................

| monuc2.png
[img]https://i.imgur.com/5yUVrXK.png[/img] A Clockwork of Circles and Tangents It is further proof that the monkey glyph is Science-Art at its best. The three circles identifying the position of the head-hands-feet are directly derived from the Mother Star by a consummately clever and simple method: The construction uses four concentric circles: (1) Mother Star's inner circle (2) circle whose radius is the height of a pentagon inscribed into the inner circle (3) Mother Star's outer circle (4) only an arc of circle '4' shown — its radius equals the combined radii of the circle '2' plus the inner circle. monuc5 [img]https://i.imgur.com/o4Bal3Z.png[/img]  These circles let us draw three tangents: two vertical tangents: 'a' to the outer circle of the Mother Star (circle '3') 'b' to the circle '2' One horizontal tangent: 'c' to the top of the Mother Star's inner circle. The Hands-circle can be drawn since its center is at the intersection of 'a' with circle '4'. Next, 'd' is a line of centers drawn between the Mother Star and the Hands-circle, and extended to the far side of the Hands-circle. From the endpoint of line 'd' we draw the horizontal line 'e' — the tangent to the top of the Foot-circle. The Foot-circle can be drawn since it is bounded from the top by 'e', and from the left by 'b'. As with the Foot-circle, to locate the Head-circle we need to establish the line 'd' first in order to draw a perpendicular line to it ('f') . It is also a tangent to the Mother Star's inner circle. The Head-circle can be drawn since we know that its center is at the intersection of 'f' and 'g'. Special EffectTwo distances involved measure 17.9999.. X-Star meters - almost a perfectly round value: These are the distances of the centers of both the Foot-circle and the Monkey Star to the nearest corner of the other circle's pentagon. An interesting tidbit with respect to the existing units of length— the vertical distance between the center of the Mother Star's inner-circle and the nearest corner of the Foot-circle's pentagon is 17.9999... , and the same applies in reverse, of course. The nearest corners of the two pentagons are 9.002... away from each other 17.99992547 ÷ 9.00235481= 1.999... These numbers are conspicuously close to being whole. below : a diagram from the original report — cat1.gif [img]https://i.imgur.com/LCgzV8K.gif[/img]  There s an alternative way to establish the Head-circle in much the same position; however, it does not rely on tangents only, so it is not as consistent. In this version, the center of the Head-circle is at the intersection of 'f' & 'g'. We already know 'f' (perpendicular to 'd'); 'g' is a vertical one-fourth grid-line of the Square. Sorry for any confusion due to my naming two lines by the same letter 'g'. monuc6.png [img]https://i.imgur.com/k6yBfrs.png[/img]  The distance ('k') from the center of the second version of the Head-circle to the center of the Cone's Key-circle is remarkable in that it is 11.7777777 units (rounded to seven decimals). The first version of the Head-circle is 11.76667 units away (rounded to five decimals). The difference in the two distances is 0.01110268 units (about one centimeter). While there is no obvious deeper significance in these numbers, in my opinion, they deserve a mention for their aesthetic value. monhc9.png [img]https://i.imgur.com/tZGbuIk.png[/img]  When the two versions of the Head-circle are shown together, there is only a minute difference between them. Also, a smaller concentric circle for each Head-circle follows the curvature of the top of the head really well, thus adding to the credibility of the Head-circle idea. |
| The monkey and Athena share the same theoretical
approach to the 5-pointed star. To
establish their overall conceptual identity, the monkey
must also share in another unique idea — the Square.
Whereas the Square stands out in the engraving, it is out of sight in the monkey. However, the Cone is similarly out of sight in the engraving; so this could be a symmetrical reversal of roles. Therefore, the experimental followup requires the joining of the Square to the Cone (Mother Star) over the monkey glyph. To appreciate these experiments, the reader needs to be familiar with the initial discovery of the Cone & Square concept. Time-out: catching on to the higher order in the Athena-engraving The engraving had me completely spellbound at the first sight. I sensed something fantastic percolating in my subconsciousness, but I could not focus on it. I put the book with the image back on the shelf and made a mental note to come back to it sometime. Months later, while enjoying a book on subliminal artistry — I had a flashback to the engraving, an epiphany that the prehistoric artist had used sophisticated subliminal techniques. . The metamorphosis of a supposed caveman into a scholar and a master of psychology was a watershed event. Forthwith, I spent many hours navigating the engraving's superb art. . Since the engraving is on a stone tablet, there is no up, down, nor sideways in it. Was mandala its true original concept? In my view, it was. When the engraving is oriented Athena's face up, a fascinating sight stands out. Her torso, the center of the image, looks like a lens with a pyramid in the middle. Next, it is just a matter of time to see that the apparition is part of a complete scene! Image below: Athena wears a long robe ending at the bottom in points C and D. The lens with the pyramid held in her upraised arms, she looks skyward. |
| Athena's
torso became a flying saucer, including a cupola. Shapes
within it evoked three pyramids. Big aircraft
(formerly legs) were incoming from the right. The
pyramid in the center piggybacked on a fighter-like
plane. In fact, the entire image could be disassembled into elements that looked like potential technology. (Had I been aware of the legendary 'Abydos Helicopter' lineup of advanced craft depicted near the ceiling of the ancient Egyptian temple of Seti I and Ramses II, the impression would be that much more convincing.) Could it be that this image held encrypted information on prehistoric civilisations, pyramids, or even Aliens? |


| Sadly, when I tried to share my impressions
with others, I ran into a wall of skepticism. I had no
proof.. But I did get unanimous credit for great
imagination... Were the Ancients just teasing, mocking from the shadows of the past? On the other hand, if they weren't, they might have furnished solid evidence through formal design. Thus was born my initial hypothesis - an optimistic assumption that those who had produced such great art were also distinguished by high ethical standards; and so the art in question was not designed to mock but to communicate. I didn't give up. |
|
The Breakthrough I suppose that if only experts had looked a little longer and harder at the Athena-engraving, they would be bound to notice, as I did, that Athena's torso is an element of a square formation — the Square. It was just an impression, but it was strong enough to act upon. Promptly, I purchased a pair of compasses and a ruler, got some blown-up copies at nearby printers and tested my impression (hypothesis). Sure enough, marked picture points served as centers of arcs expressing the lens. Those centers then formed a square with the intersection points of the arcs. All four corners of the square were in the black, and the lines connecting them, as well as their axes and other associated lines, showed harmony with the picture lines. |

| The Square's
entire formation can be shifted slightly so that the lens
at its center tracks the two long arcs of the torso along
their entire length. This is a confirmation of the whole
idea in a different style. |
.....

| The
Key-circle I detected its existence soon after the Square by the same "just looking" method. It became conspicuous, because the Square's top corner lies on one of its two arcs. I asked myself if these arcs could be parts of the same circle while being symmetric through its center, because that was my visual impression. An experiment then validated the question. |
....

| There was an
additional reward for implementing the idea; the circle's
center turned out to also be equidistant to both the
Square's top corner and its center. All in all, the whole was obviously systematic
and expressible by the below diagram. |

| Energized by
the result so far, I soon identified yet another lens
given by the overlap of two same-sized circles in the hip
area of the figure. Just like that, out of the subliminal
camouflage, a precise mechanism surfaced into view — an
authentic OOPArt, unquestionably. Also in sight are six circles which seem standardized to the same radius. Each of the six circles completes a visibly circular engraved arc. The two arcs seen below Athena's right knee set up a diamond consisting of two equilateral triangles. |

| Below — an
abstract of the position from above — it involves Athena's
figure from head to toe. That the position obeys exact
rules is obvious. Moreover, since it looks like the left
side of the lower equilateral triangle is tangential to
the green circle on its left, the entire pattern could be
abstracted (reconstructed from memory), if only the exact
position of the Key-circle were known. Knowing that its
center is equidistant to two known points on the Square
does not suffice, unfortunately. |

| A Dose of
Reality Apparently, this Stone Age engraving had the potential of being the world's most sophisticated drawing geometry-wise and might turn out to be the most important one of all time. Therefore, it was my duty to bring it to public attention. I walked into the mathematics department of the University of British Columbia and told a professor who happened to be present that I was seeking expert opinion on a prehistoric image with some unusual properties. He said that he was between lectures, but could spare fifteen minutes. We stepped into his cabinet, sat down, and I handed him a blowup of the engraving with my analysis superimposed. In almost no time at all, there was a pronounced change in his mien; the professor became totally absorbed in the picture. I kept quiet and time slipped away until it was obvious that the professor was already late for his classes. Finally he looked up and asked, "what do you want to do with this?" * The gist of the ensuing conversation: a) the professor categorically agreed with my conclusion that the abstract geometry I observed in the image was a deliberate creation of the artist |b) we were dealing with an important discovery. [c] As for myself, a non-mathematician, I would be happy with being credited for the discovery, but qualified experts should take over the investigation of scientific contents of the fifteen-hundred engravings from La Marche. Hopefully, I earned the privilege to be given access to the engravings to study them from other aspects. The extremely convoluted engravings needed to be unraveled into individual imagery, and I have already developed some techniques allowing one to steer clear of the traps of pareidolia and apophenia. We agreed to meet again in a week's time. In the meantime, the professor would also introduce the matter to colleagues at the department. A week later, the professor informed me that his colleagues unanimously rejected my effort as pseudoscience; in any sufficiently complex drawing, a seeming deliberate order can be found which is purely coincidental, however. He had to agree. When asked about contacting him should I I discover more relevant material, he told me not to bother. "You are fishing," he said. Indeed, there was something fishy about his abrupt turnaround, yielding his qualified judgement to clichés. That was the end of my foray into UBC. I did my duty and got a lesson on what to expect from the academia. Of course, I didn't stop thinking about the problem; and in not too long, I found an elegant solution to how the Key-circle got into the already identified pattern. This meant that I was able to recreate the entire pattern from scratch. |
......
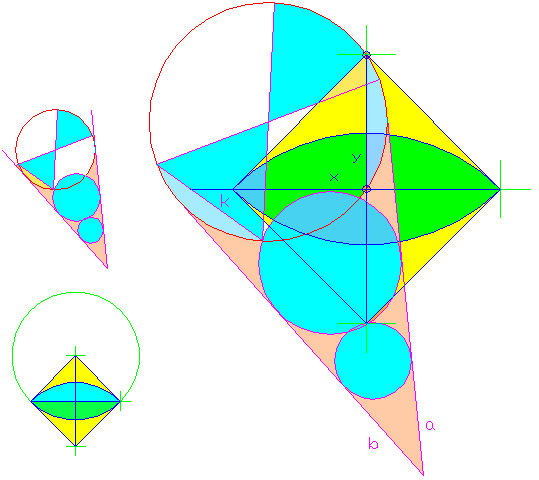
| The Cone — A Star is Born A group of circles seemed meant to be standardized to the same size. The center of one of those formed a straight line with the centers of two other circles of different sizes — the Key-circle higher up, and a smaller circle lower down. Moreover, all three were perfectly symmetric. This set up the (red colored) cone seen in the illustration above. The Cone was enticement to buy a protractor and measure the Cone's angle. It was close to 36° — the angle seen on 5-pointed stars. Was the Cone actually a part of such a star? If so — what was its size? By then, I was a believer in clues; the Ancients were cluing me in all along. so far. And there seemed to be a clue for the occasion — a circle which is ubiquitous could be some sort of a unit circle. The middle circle of the Cone was one of the hypothetical unit circles, and so I experimented by measuring the sides of the Cone with it, as seen in the two diagrams below. Obviously, the experiment was an astonishing success. In one fell swoop, it explained the positions of both the Middle-circle and the Key-circle. a) Cone's Middle-circle The upper intersection of the circles centered at the distance of three radii from the tip of the Cone is also the center of the Cone's Middle-circle, tangent to the sides of the Cone. It looks identical to the unit-circle but is almost imperceptibly smaller: If the unit-circle's radius is 1, the Middle-circle's radius is 0.9975... (Naturally, these fine differences can hardly be identified on a drawing board.) b) Cone's Key-circle There are two ways to recreate it: a) The upper intersection of the (yellow) unit circles centered three radii from the Cone's tip is the exact mid-point on the Cone's axis between the Cone's tip and the center of Key-circle. The unit circle concentric with the Key-circle is then tangent to the upper row of unit circles. b) A circle whose radius is 2 units and is centered four radii from the Cone's tip then intersects the Cone's axis at the exact center of the Key-circle. 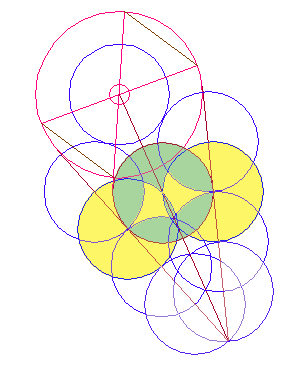 s cona1.gif https://i.imgur.com/bBncUui.gif Evidently the Cone is derived from a 5-pointed star whose sides are seen as 5 units long. It is an elegant and original concept exposing pentagram's properties not mentioned in modern theories. See more more on the subject here: https://www.vejprty.com/seat1.htm Cone's Small-circle Unfortunately, the exact reconstruction of this small circle in the abstract geometrical position still eludes me, but this circle did its job, as at least three circles are necessary to bring the subject of symmetry to attention. |

| The Cone's
unit circles simultaneously expose how to integrate the
Square into the position. Diagram below: a) the x-axis rests on two of the unit circles, centered four and three radii respectively from the Cone's tip b) the y-axis is inserted at the point where the Key-circle intersects the x-axis (on the right hand side) c) the Key-circle intersects the the y-axis at the Square's top corner That's all the information we need to recreate the Square. |

| The
5-pointed star which creates the Cone & Square
formation is called the Mother Star. The Cone & Square formation is the basic design platform for both Athena and the monkey. |
|
Nazca Monkey's Equivalent of Athena-engraving's Cone Of the five cones on the Mother Star, the one with sides parallel to the Big-X was the obvious candidate for the Square's origin. ....... The Moment of Truth In the summer of 1991 I was in Prague and so I took the opportunity to visit the mathematics faculty building of my Alma Mater, the Charles University. It was a hot day and the building seemed deserted. I saw a cabinet with its door ajar. The man inside, mathematics professor Jiří Fiala, cordially invited me in. I described my discovery and handed over the report I had brought along. The professor was clearly intrigued. After some time he asked if I wouldn't mind if he leaves me alone for a while in order to return with a colleague who he thought would appreciate the "show". After a long "exam" by the two mathematicians in a friendly atmosphere, I was asked to leave my report, and the professor would let me know his official opinion by mail. Indeed, before the summer was over, he sent me an official letter stating that my theory was plausible, but for a conclusive proof, the same system would have to be identified in other artifacts. That task seemed impossible. For one, I had no access to the fifteen-hundred La Marche engravings. Moreover, the institution in control of the stones, the Parisian Musée de l'Homme, had reacted strangely to my attempt at communicating with it. <http://www.vejprty.com/silence.htm> Suddenly, there was the monkey with its own variation of the Cone. Next, adding the Square to it drew back the curtain on an extraordinary harmony between the monkey and the Square. From there on each site became a research catalyst for the other. For instance, one of the main messages conveyed by the monkey glyph is a hard to miss reference to a specific way of constructing the 5-pointed star. It made me wonder if the tendency to echo each other's ideas applied in this case as well. Testing then revealed that the same idea has a wide spread presence in the engraving, much wider than in the monkey, and led to invaluable new insights which would otherwise be much tougher to come by. So, Nazca and La Marche had formed a two-way channel for a flow of ideas. Then, the same idea let me design, from scratch, an exact duplicate of W.F. Petrie's Giza ground plan, leaving no doubt that the three pyramids had been planned together. Yet, a skeptic will comment that the fact doesn't prove that Giza is directly connected to La Marche and Nazca. It could be a rare coincidence. Yet, the connection would be firmly established if Athena and the monkey unmistakably echoed the Giza ground plan. Testing then showed a strong presence of the Giza plan in both, and especially, in Athena. The clarity of that fact is beyond crystal-clear. Therefore, the Giza plan was already around some fifteen-thousand years ago. Step by step, we witness a long march of coordinated ideas creating an undeniable reality completely at odds with official history. It needs no reconciliation with anything. To paraphrase René Descartes "Cogito, ergo sum"— it conveys thought; therefore it exists. It is the mainstream historical science which has to reconcile itself to this unapologetic reality. ..........  The Test In the above diagram, the peach colored diamond is the Square, as set by the blue Cone. Even at a glance, the result is impressive. |
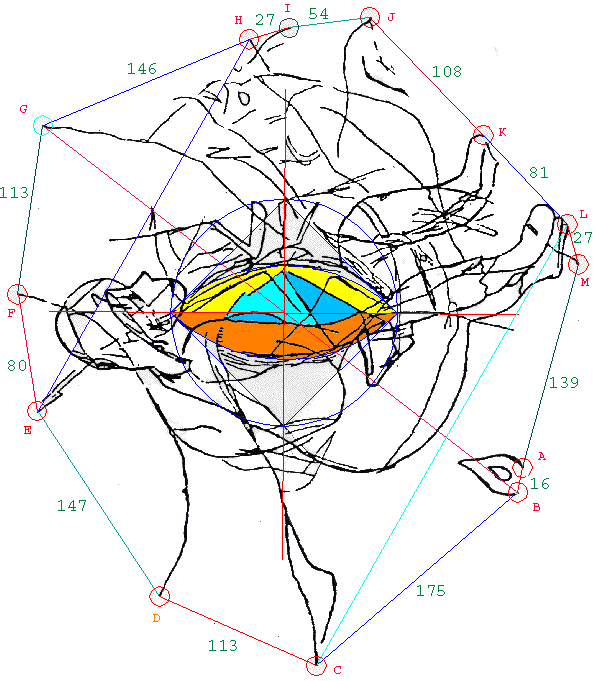
The Square's diagonals are oriented to the cardinal pointsIn fact, designers customized the entire figure to make sense when oriented to the Square's diagonals. It is a clear message that they are fully aware of the Square, and so is the monkey:Its arms pantomime a similarly sized square turned 45°. Three corners of the Square are anchored in the monkey's figure — the spine, a knee and a hand. A horizontal line marking the southern reach of the monkey passes through the Square's top corner. The spine is a tunnel for the vertical line through the Square's left corner. One of the monkey's thighs is a tunnel for the horizontal line through the Square's bottom corner. The Square's vertical diagonal tunnels down the upper right arm. At the top, it it is a divide between the left ear and the skull. Below, the feet are almost entirely to the west of this line. |

|
• the spine divides the monkey in half neatly along the East-West axis Monkey's Bounding Rectangle & Golden Triangle's Bounding Rectangle The Golden Triangle is an isosceles triangle, where the side-to-base ratio is 1.618..., the φ-ratio (a.k.a. the Golden Ratio; Golden Mean; Golden Section; Divine Proportion; etc.) The monkey's bounding rectangle in the above image is slightly longer than the bounding rectangle for the Golden Triangle (with the red line as its eastern limit) — . The two inscribed triangles are very similar. The below photograph shows some serious damage to the eastern portion of the spiral tail. Obviously, Maria Reiche had faced a difficult challenge in establishing the exact contours of the lines in this damaged area.  |
| Is the vertical line through
the Square's eastern corner intended
to be the figure's central axis? The superior accuracy of Reiche's photograph helps an exact idea emerge from the shadows of the inaccurate digital tracing, where the Square's left corner comes close to being the midway point between the left and right sides of the bounding rectangle. Now, in the interest of proving that the design is based on exact ideas, it would be ideal if the Square's corner were perfectly placed in the middle. Since the left side boundary of the monkey drawing is damaged, we are limited to asking, "Starting from the left corner of the Square, is the right side of the monkey's bounding rectangle a precise facsimile of one-half of a bounding rectangle for the Golden Triangle?" If the answer is 'Yes' then it is a virtually certain that the complete bounding rectangle of the undamaged drawing was the same as the bounding rectangle for a Golden Triangle. The left hand's thumb marks the boundary on the right. Though the tip of the thumb is blurry in the below picture, it does look like the red line is truly close to being the bounding line. Next, make the monkey's bounding rectangle double the rectangle from the Square to the thumb. ...........  monhedt.png
[img]https://i.imgur.com/XgdQ21E.png[/img] monhedt.png
[img]https://i.imgur.com/XgdQ21E.png[/img][img]https://i.imgur.com/e4DHNgr.png[/img] monquad2.png .............................Height of the Bounding Rectangle We already know the height of the bounding rectangle because it is set by the following construction: ......  |


| The 'golden-circle' at the bottom corner of
the Square,
instrumental to drawing the
exact star, looks
identical to the circle drawn around the Foot-square.
Drawn concentric, like on the right side of the above diagram, the circles look like a single circle .  above - the same geometry by itself The Foot-square is an intriguing addition. What is its purpose? I thought it was it a reference to the shortest rigorous method of drawing the 5-pointed star, because the first line drawn then doubles as the horizontal arm. In fact, one other method is a step faster, but it is the 13-step method which enables progress in our investigation. It is a starting point to many continuations (see "Construction of the 5-pointed star in 13 steps" in the Appendix). A Crucial Test Does the same design set the height of the bounding rectangle for the monkey in the photograph?  (The circled yellow star is the original Mother Star from the Cone) Success! The distance from the bottom line of the Foot-square to the top of the Square is perfectly identical to the monkey's height — line-edge to line-edge! Note the precise horizontal alignment of three elements at once — head - ear - elbow. |
[img]https://i.imgur.com/Mg4JFZr.png[/img]

| above: The
resulting rectangle is a visually perfect bounding
rectangle for a Golden Triangle. The algorithm can be used for exact reconstruction of the bounding rectangle . The triangle's side length then works out to 105.86666343 units (the green-colored Mother Star's arms are 50 units long). (The Golden Triangle sides form the angle of 36°) Height of four Foot-squares ......................= 65.505307 Height of the Golden Triangle's enclosure = 65.429196 Ratio = 1.001... The triangle inscribed into the rectangle, based on five times the diameter of the inner circle of the Square's edition of the Mother Star, is visually the same as the Golden Triangle. The image also shows two arcs whose radii are based on the length of the respective rectangles: 100.68518011 and 100.40570791 units — ratio = 1.003 Both arcs are 66.6.. units long. We can visually duplicate the rectangle bounding the Golden Triangle by a rectangle whose height is four times the side of the square inscribed into the Golden Circle of the Square; and whose length is five times the diameter of the inner circle of the Blue Star: * |

Construction of the 36-degree angle  The diagram above shows the first six steps. Step-1 is a horizontal line, and an arm of the sought after star.  step 7: |
.
 The points 1 and 2 are there from the previous diagram. A circle from the point C, through 1 and 2, shall be equidistant to the points 3 and 4. steps 12 and 13 complete the pentagram: draw lines from 3 and 4 through C to meet the horizontal line from step 1, |
| The
Trans-Atlantic Connection & the Foot-square The Foot-square theme seems to be the culmination of monkey's geometry. Not forgetting that success of my analysis was so far due to the hypothesis that the monkey's geometry duplicated the Athena-engraving's basic geometric system, I had to wonder if Athena's system included the Foot-square idea. It turned out that Athena gives this idea quite an in-depth treatment. Its description takes considerable space but is unavoidable since whatever it tells us about Athena has a bearing upon the monkey, too. The Athena-engraving already has its Square; so we just add the 13-step star with the Foot-square to the template. We have to rotate it 90 degrees; however, so it points towards Athena's feet (diagram below). By the way, unlike the barefoot Nazca-monkey, it's clear that Athena has footwear on. To me, it looks like a heeled boot with a stirrup on her left foot, and something not so easily identifiable on her right. Whatever it may be, it is startling in that it has three toes just like the monkey. 
There is much in the above image that deserves prolonged contemplation. What strikes one's eye immediately: the bottom of the Foot-square does exactly the same thing here as in the monkey glyph —it limits the right foot from below with maximal accuracy! With the sole exception of its left side, all the other lines define the foot in some way: * the right side of the Foot-square is a perfect limit for the middle toe * the lower left side of the inscribed square forms a perfect limit for the heel * each side of the inscribed square, all the diagonals and axes relate to the engraving in a meaningful manner. For the sake of brevity, I skipped listing all the instances. the other Foot-square * the width of the left boot including the stirrup, is the width of the Foot-square * counting from the top of the left leg, the line of the left side of this square relates meaningfully to the engraved lines in the area fully six times; * the horizontal axis also correlates with the engraving strongly; * the extended right lower side of the inscribed square is a perfect boundary to the three toes of Athena's right boot. As a rule, neither monkeys nor humans, not to mention boots, are three-toed; so this 'coincidence' cements the special relationship between these figures. an unexpected "coincidence" For good measure, moving the Foot-square over Athena's head results in an amazingly precise fit. It is shown below at about 2 X lifesize (inscribed in the Square's golden circle along with a star).  So, overall, the experiment of testing the concept learned from Nazca against the Athena-engraving worked out beyond my mildly optimistic expectations. I had found three prominent instances of the Foot-square in Athena. Along with the previously discovered material, it was enough confirmation for the initial hypothesis. Satisfied, I went on to other things. Following the script Years later, and after much progress on other fronts, I returned to these Foot-square phenomena in Athena. I got the initial Foot-square by construction, but the other two by just shuffling about the figure. Yet, I knew that there had to be a correct way to do it by exact design because that's how the Ancients did everything else. The Foot-square is inscribed in the Square's golden-circle used in construction of a 5-pointed star; so it's natural to experiment by also inscribing the circle around the Foot-square with a star of its own.  |
The Big-X (Monkey-tree) |

| Line 'c' of the Big-X is set by the a pentagon side within the golden circle around the Foot-square. . Accordingly, the stars on the Big-X have arms the length of the pentagon sides (see above). |


| God
Sent Monkey As long as there was just the engraving, its Cone & Square spirit was unanimously credited to my imagination. The Nazca Monkey's intervention had once and for all decided the issue of who is the creator of the Cone & Square idea in favor of the prehistoric agency. It was a virtual miracle and a guidance to some of the engraving's secrets, which would otherwise take much longer to detect, if ever. Learning that both works were based on the same template was decisive. Sharing the Cone & Square idea means that both designs were developed from the 5-five-pointed star; therefore, they can be brought to the same scale and viewed as two layers sharing the same star. The Athena Engraving and the Nazca Monkey glyph are vastly different from each other in size. In the image below, the two were merged for comparison on the 1 : 1 scale by adjusting their size to where their respective 'mother' stars merged and became one and the same. In the image, the square base of the Great Pyramid appears above Athena's head. Subsequent analysis shows extensive correlations between the two. However, there is no such pyramid above the monkey's head. Does it mean the absence of such correlations for the monkey's head? |
13stepg.png [img]https://i.imgur.com/tQTenZz.png[/img]
.............................

| The
construction of the Giza ground plan begins with a
specific pentagram construction, just like the Athena
Engraving and Nazca Monkey. Here, already at an early
stage of the construction, we see the appearance of the
Great Pyramid (top left in the above diagram) in correct
proportion to the bounding square for all three pyramids
(the diagram includes a preview of the other two
pyramids). In Giza's case, the construction starts on the left side of the Mother star (blue) and proceeds clockwise. But it could just as well start on the right side and proceed counter-clockwise. |
malpa11a.png [img]https://i.imgur.com/OOuHO2H.png[/img]

| In the above
image, the Great Pyramid (yellow square) shows strong
harmony with Athena's head, while the other iteration of
the pyramid (in the counter-clockwise direction) shows
strong harmony with the feet. This can be seen by following the lines a,b,c,(parallel to the Square's horizontal diagonal) drawn from major points of this other pyramid. These lines form precise limits to Athena's feet. Moreover, line 'c' also forms two precise limits to Athena's head. The half-green circle is a duplicate of the circle inscribed into the Great Pyramid's base. It is the best solution for its seminal arc forming its top, because it is held in place (bounded) by elements of the image. |
malpa22.png [img]https://i.imgur.com/9dnnp9Q.png[/img]

| Adding the
monkey to the mix shows some similarities in how the two
figures relate to the Mother Star and the two possible
positions of the Great Pyramid. Here too, the monkey
figure of the photograph shows superiority over the
factorized tracing in adherence to the existing geometry.
For instance, while the top of the monkey's head protrudes
through the Great Pyramid's axis in the diagram above, the
same line (1) is a precise tangential limit to the head in
the below photograph. This is simply excellent, and more
such excellence is still to come. |
monhepy8.png [img]https://i.imgur.com/Fg4OAAe.png[/img]

| The doubled square of the Pyramid (the diagrams above and below) A square based on one diagonal of the Great Pyramid and the grid inside define features of Athena's head. It is exciting to see something similar in relation to the Nazca Monkey's head A square based on the Pyramid's diagonal (the blue diamond) is twice the Pyramid's area. When it slides down along its vertical axis, as the red diamond, it is close to a perfect fit on three sides of the head. Let's remember this square and the vector along which it moves for later. The cyan circle is the Great Pyramid's circumcircle and is also a remarkably close fit for the monkey's head. |

| Phi expansion of the square of the
Pyramid below: A simple procedure leads to a stunning observation: Attach lines 'a' and 'b' to the monkey lines at the points shown by arrows. Outcome: The two lines had created ten golden rectangles where there were none before.. These lines also expanded the original square of the pyramid by the golden ratio. If we assign the value of 2 to the length of the pyramid side, the length of the new square side is 2.618..., or Phi squared. |

Measured axial and diagonal moves

| Let's move the
expanded square along its diagonal so that its top right
corner is now at the pyramid's center. The square is now a close fit for the monkey's head — three times at the inside line edges and once at the outside edge. Expanding the square a touch produces the red square, another close fit for the head — three times at the outside line edges and once at the inside edge. The broken green line reveals a perfect horizontal alignment of the monkey's back with the left arm. |

| The right ear
on the outside, and the left one on the inside curve are
both bounded by golden diagonals (yellow). —
Also attention worthy is how the head line below the right
ear runs quite perfectly parallel to the golden diagonal
just underneath. |

| Pure Magic The same square when rotated 45-degrees doesn't align with the head at all. But if moved horizontally so its vertical diagonal merges with the nearest vertical side of the pyramid, the same outstanding fit reappears. |

malpa34.png

malh20.png

malpa35,png

| It is now
manifest that the positions of the Great Pyramid and the
monkey's head are mutually coordinated within the context
of the Mother Star. Primary and Secondary Positions of the Great Pyramid There no stranger thing than a notion of pyramidal motion. Yet, the concept is an established fact. https://vejprty.com/gizam.htm The linked article about the Athena Engraving and the Giza ground plan presents solid proof that there are two positions of the Great Pyramid integrated into the engraving's structure — primary and secondary. The present article shows a clear repetition of the same concept in the drawing of the Nazca Monkey. It is but one of a number of geometric concepts shared between the monkey and the engraving — cementing the fact that both designs plus the Giza plan owe their existence to the same agency. Evaluation of the analysis based on Maria Reiche's photograph Long ago, in 1993, I had submitted Reiche's tracing of an aerial photograph of the monkey to a service specializing in conversion of technical drawings into CAD files. Though it would be preferable to use a scan of Reiche's photograph directly for the analysis in CAD, it wasn't yet practical to manipulate large bitmaps on anything less than costly workstations back then. For various reasons, three decades had gone by before I got back to repeating the same experiments directly on the seminal photograph. I expected an improvement on the existent results. If the monkey's creation were under control of the same agency that gave us the Giza pyramids and Athena Engraving, which show great faithfulness to the underlying design, then the monkey glyph should be of like quality. And that's how things turned out. |
| Overlaying of
the original vectorial version of the monkey glyph over
Reiche's photograph had exposed surprising sloppiness by
the CAD service I paid for the job. Luckily, the
distortion wasn't so great as to cover up the essential
fact that the monkey encodes exact geometric
ideas. There seems to be very little distortion in the actual photograph, because the inherent abstract design closely corresponds with lines of the figure — a truly remarkable fact since the glyph is officially almost two-thousand years old but could also be much older, as old as the pyramids or the Athena Engraving. (our 1 meter = 0.931 metric meter) |
[img]https://i.imgur.com/7sC1ClS.png[/img]

| Figures United Around the Mother Star The heads of both subjects are similarly positioned across the mother star's vertical axis. Both heads are planted in the other subject's midsection at a similar depth. The monkey's hands seem to interact with the contours of Athena. This also seems true for the rest of the monkey's body. Magician's Hands There is no practical way of deriving the Hand-circle from the Athena-engraving by itself. Yet, once the engraving and the monkey are united over the Mother Star, we see that the monkey's Hand-circle has a hand in the Athena-engraving's design. Without each other, the Athena-engraving, the Nazca Monkey and the Giza pyramids are incomplete puzzles. * ( below) Parallel to a Mother Star's arm, 'b' is an exploratory line cast from the Hand-circle's center, already a hub of other lines. It is conspicuous by being connected to Athena's head in forming a limit to it; and midway of its course, it rests on an arc which looks like a pivot point between the head and the Hand-circle. The line also cuts of a golden triangle from the Mother Star, potentially, a part of a smaller star. |

|
the Hand-circle Star &
the Monkey-head Star Acting upon that clue then reveals a conspicuous star ("Hand-circle Star") which centers precisely at the edge of an engraved torso line (with 'c' inside in the above diagram), and one of its arms merges into a neighboring engraved line — except for this line, the other lines within the top half of lens-like torso have been long identified as systematic (see the decades old diagram 'torang.gif' with angular description of those lines in the addendum.) Next, the new star's circle fits the circular top of the monkey's head better than any other circle! And looking from the center of the circle in the head, a single ray, a line of vision, tunnels through the entire engraved line 'c'. Not a cone of vision, just a single ray. The Hand-circle Star within the circle in the monkey's head also shows considerable harmony with the engraving. The Hand-circle Star's name in the new position changes to "Monkey-head Star". proste.png  This line 'c' must not be confused with line 'c' in the diagram below. It's easy to do (I did it it) because both lines do the same — they start at the inside edge of the engraved line and exit at the opposite edge, but they do so in reverse to each other. |
pyrstar9.png

|
Above:
The other line 'c' combines with 'd' into a reappearance of the Big-X, but at 72°, double its angle. These lines, as you see them, are exact CAD drawn whole angles. Note that line 'd' upholds the same principle as the 'c' line — from one edge to the opposite edge... With the Square's vertical axis, the lines create a triangle found on a regular 5-pointed star; and the triangle is completed into a star. Though exact, the star only approximates its intended meaning. How do I know it? Because the signaled star concatenates into an extensive system. A Look-Back A long time ago, I explored the same position, using just the classic drafting tools — a large drawing board, fine pens and compasses on paper copies at double the lifesize of the engraving. That's much smaller magnification than that of the above image. In such circumstances, when everything except the thickness of pen-lines shrinks several times, the above image will start looking a lot like the image below — a virtual facsimile of what I originally got on the very first exploratory step — the crimson-green star, and the rest, except the Square's golden circles. There, the Square's horizontal diagonal divides the star's vertical side by the Ø-ratio, the Golden Section. the Pyramid Star The crimson-green star is the Pyramid Star. We'll show it to be an important part of geometry implicit in the Square. |
[img]https://i.imgur.com/biFWerh.gif[/img] torso2.gif

| Diagram below:
It
shows the geometry from above without the engraving.
The 'a' line subtends a bent engraved line. * the two yellow circles are the Square's golden circles * lines 'a' 'b' 'c' 'd' are based on engraved lines * the red circle is connected to everything else; it lets us reconstruct the cyan lines 'c' 'd' (At first, I didn't realize that the red circle is the inner circle of an influential 'Central Star', which plays seminal roles in several upcoming analyses) * the cyan lines hold 30° angles with the x-axis * lines from the golden circles' centers tangential to the opposite circle hold 18° with the x-axis * the intersection of the red circle with an axis of the Pyramid Star gives the point '1' * the point '1' is the origin of 'd' — visually 'd' intersects the Square's corner, but it misses by just a little * a line from '1' at 30° to the y-axis intersects it at a point which is then the origin of 'c' * horizontal tangents to the golden circles plus their vertical diagonals form a golden rectangle * the green disk represents the lens like torso and is derived from the Square. [img]https://i.imgur.com/GxumtLs.png[/img] malhla77.png  |
| Constructing
the Pyramid Star inside
a
Square There is more than one way to construct the Pyramid Star within any square. #1 - from a series of three golden circles: The green circle represents the Square's outer circle; the cyan circle is golden to the green circle; and the magenta circle is golden to the cyan circle. [img]https://i.imgur.com/XkLCbxu.png[/img] ..................  [img]https://i.imgur.com/0nWsJyE.png[/img] ................  The Central Star Draw lines from the points of '1' and '2' through the axial center to get the green circled points. Connect both pairs of the green and cyan circled points by lines and extend them as shown. Connect the top pair of yellow circled points, and the yellow star, the Central Star, is born. [img]https://i.imgur.com/gxl8GLK.png[/img] pyrsta15.png ...............  Next, draw the line '1'. Then draw the help line 'a'. Draw another help line from the green circled point through the intersection of lines '1' and 'a'. This gives a complete set of points to connect by lines to produce the cyan star, the Pyramid Star. Constructing the Pyramid Star inside a Square #2 - from two mutually golden circle and an 18° line: [img]https://i.imgur.com/XlgdTY6.png[/img] pyrst2.png [img]htt  |
[img]https://i.imgur.com/SrGxpXq.png[/img]

| ... * draw the yellow circle ( Central Star's inner circle) * draw the help line 'a' * draw the help line 'b' * connect points Central Star's construction # 2 [img]https://i.imgur.com/2mYJOVw.png[/img] pyrstar10.png  Having the Square's golden circles in opposing corners of the Square makes the Central Star's construction even simpler. The yellow line gives us the center of the yellow circle. Next we just connect points. Below: the Central Star in the context of the engraving shows clear signs of custom fitting. (Note - any future mentions of the Central Star's circle refer to to its inner circle.) |
[img]https://i.imgur.com/3G9QvlM.png[/img]

| golden circles of the
Square fit Athena's head |
[img]https://i.imgur.com/XgmHTNF.png[/img] malhla55.png

|
above: Circle 1 is centered in the Square's left corner and is its golden circle. Circle 2 is the golden circle of circle1, and circle 3 is the golden circle of circle 2. Circles 2 and 3 are concentric and their center is a point on circle 1. The conspicuously good fit of these circles to the head gives a strong impression of being deliberate. Recall how the circle of the "Hand-circle Star" seems to fit the best the round top of the monkey's head. Here we have an analogical situation in which a golden circle associated with the Square is the best fit for the round upper part of Athena's head. Moreover, circle 3 also presents a good fit to the head, as it fits between two long and roughly parallel lines, but it is outdone by its copy, the cyan circle, which is held in place on four sides by a bounding box formed by the head's features. |
Affinities among the Pyramid Star & Hand-circle Star & Central Star
[img]https://i.imgur.com/6JwXtV2.png[/img] pyrstar06.png

....................
| above: The red star is the Hand-circle Star, and the blue star is the Pyramid Star. The blue circle (1) at the top is the Central Star-circle. I also copied the Central Star-circle to the circle of the Hand-circle Star. In effect, when the two circles share the same center, they appear as a single circle. They are practically identical size-wise. The ratio of these circles' radii = 1.001416 Hand-circle Star's circle ÷ Central Star's circle ..................6.09648871 ÷ 6.08786728 = 1.001416 |
the above geometry without the engraving background Lines 'a' and 'b' are drawn thicker to show that here the star lines run inside engraved lines. Additionally, each of these engraved lines also hosts the center of the other star. [img]https://i.imgur.com/RsYtCgq.png[/img] pyrstar16.png ...................  Microscopic! Points 1 and 2 are big points of the Hand-circle Star and the Pyramid Star, respectively, each being the midpoint of a star's arm. Each of these midpoints has an arm of the other star passing through with microscopic perfection. At the given scale, the fault is less than 0.0009 unit at point '1'. In the engraving this fault amounts to less than 1/1000 of two millimeters, which is less than 2 microns, and less than 0.00008 inch ( 8/100,000 inch) At point '2' the fault is 0.0056 unit, 0.0113 millimeter, or just over 0.0004 inch ( 4/10,000 inch) The two points connect by a perfectly vertical line, practically duplicating the Square's diagonal. It is just 49 seconds (0.0137°) off being exactly vertical. At this interval, 6,545.7 lines fit into the range from vertical to horizontal (magnified view below). [img]https://i.imgur.com/QUn4QfI.png[/img]  1C, the center of the Hand-circle Star, is visibly a bit off the side of the Pyramid Star. It is precisely at the edge of an engraved line, however. 2C, the center of the Pyramid Star, is precisely positioned on the side of the Hand-circle Star. Judging the multiple coincidences between the two circles, these 'coincidences' are no coincidence. |
| the
Monkey-head Star The Monkey-head Star is none other than the Hand-circle Star shifted into the cranium of the Nazca Monkey. Even with a slight protrusion at the cranium's top, it seems to have the best fitting circle for it. Touching the physical line's edges in several places without protruding is an example of abstract line on its best behavior. We see many such examples throughout this report; and this circle comes close. Actually, it looks perfect here, but that's because of my inaccurate tracing of the cranium rounder than it is... |
[img]https://i.imgur.com/q8gxUvt.png[/img]

| Exact
Positioning of the Monkey-head Star Below: The Monkey-head Star stands on line '1' — which is an arm of the Hand-circle Star, and simultaneously, a pentagon side of the Monkey-head Star. (Take a good look — the Monkey-head Star is visibly attuned to the engraving, as well) |
malhla68.png

| Below: Line '3' is an exact vertical tangent to the Square's golden circle. Its intersection with line '1' provides an insertion point for line '2', which becomes an extension of the Monkey-head Star's pentagon. Since we already know the star's elevation, we now know its exact position. |
malhla76.png [img]https://i.imgur.com/Q4FV4N6.png[/img]

| Mention-worthy: The other pentagon line ('4') from the top of the Monkey-head Star is an almost exact bounding line for the Central Star's circle. It passes to its inside at the distance of 0.00257590 unit. In this CAD drawing, an arm of the Mother Star counts as 50 units long, or about 10 centimeters, 5 units to a centimeter, 2 millimeters to a unit — Thus 0.00257590 of a unit is 0.0051518 millimeter long, or 1/194 millimeter, or 5 micron. On the scale of Nazca Monkey, this inaccuracy would amount to 500 times that, or 2.6 millimeter... All in all, a pretty fine design. Why didn't I choose the Central Star instead of the Mother Star's golden circle to set the Monkey-head Star? — Because the golden circle set the Central Star, as well. * Below we have a view of the Monkey-head Star in position over the monkey's head. The inner pentagon circle was moved (by eye) to show its close fit to the arc of the monkey's chin. Here one can see the inaccuracy at the top of the cranium, as there is a sliver of space between the circle and the cranium. |
malhl112.png [img]https://i.imgur.com/KFS4W4Y.png[/img]

malh21.png [img]https://i.imgur.com/tc5u0rk.png[/img]

| The Great Pyramid's base which is just above
the monkey's head in the combined plan has three circles
which fit the monkey's head. |
malh199.png [img]https://i.imgur.com/l3m5wcl.png[/img]

| Two of the above circles belong to the
Monkey-head Star; three belong to the Pyramid. |
malh1133.png [img]https://i.imgur.com/sWA3z5s.png[/img]

Let's overlay an older diagram over these circles. It explains their position. |
malhl118.png [img]https://i.imgur.com/LknFdKj.png[/img]

| In the below diagram the Monkey-head Star was
scaled up 2.618 : 1 and its matrix was expanded to where
it now looks like a stepped pyramid or a mastaba. As I
see it, there is much intentional correlation of this
matrix to the lines of the engraving. A shining example
of the presence of intentional design is the array of
four lines emanating from 'B', the right side tip of the
scaled up Monkey-head Star. Start from the top and check
the entire course of each of the four lines. Line '1' satisfies the engraving's rule that every subsystem has to connect to the frontal lobe point at the tip of Athena's forehead. Line '3' leads to yet another mini-discovery (see below). |
[img]https://i.imgur.com/KZIalCJ.png[/img]

| Below: The pentagon line '3' of the scaled up Monkey-head Star, stays inside the segment 'b'. I could see a similarity in the lengths of this segment and the pentagon side of the Monkey-head Star. Moreover, another line seems to divide this segment into the Golden-ratio. |
| To test these ideas, I attached the
Monkey-head Star to the line '3' and encountered yet
another instance of consummate precision in geometric
design. Bear in mind that this is a greatly magnified view. Lines 'a' 'b' 'c' 'd' 'e' of the Monkey-head Star lock the star in its position in the engraving without any room for deviation. Lines 'a' 'b' and 'd' are microscopically perfect limits to the straight line segment under review. Moreover, two of the star lines prove that the same segment is indeed divided into the Golden Proportion (Ø). One thing is certain — any shifts of the star along the line '3' will destroy all these multiple precise alignments and not create any new ones whatsoever. While such supreme precision guarantees exact design process, this being a fresh matter, the second coordinate needed to position this star exactly is still waiting to be identified. |
[img]https://i.imgur.com/j8kFAcS.png[/img] malhla87.png

eye! |
[img]https://i.imgur.com/XzPh8jY.png[/img]

eye! |
[img]https://i.imgur.com/KaEzmz5.png[/img]

[img]https://i.imgur.com/KDHvcY6.png[/img]

As Above So Below A long time ago, I noted that the area below the Square's bottom corner implied an orderly grouping of five-pointed stars oriented to the Mother Star. The engraved lines were my guidance to the below constructions. It's noteworthy, how close I got to the eventual exact solution. |
sqbot.png [img]https://i.imgur.com/3HCDBpi.png[/img]

| Below: Since the exact course of line 'a' was already given in the matrix of golden rectangles based on the Third Pyramid, the addition of the Central Star had yielded the exact position of the point "P' — the end of this line., and the beginning of line 'b'. These two lines form the corner of a pentagon, a receptacle for experimentation. |
prostar2.png [img]https://i.imgur.com/fpNu7Ly.png[/img]

| Below: We can scale/expand a star from 'P' as a corner of an inner pentagon, and observe the process for anything unusual. . Here we see that the expansion met a number of stops, all at the same time. One of those is line 'a', which happens to be identical with a line of the Monkey-head Star, meaning that we now have enough information for an exact reconstruction of this new star. Thus, the experiment was a success deepening our systematic knowledge of the engraving. |
prostar5.png [img]https://i.imgur.com/cZbNUUY.png[/img]

| Below: The pentagonal receptacle can also accommodate an already existing star, such as the Monkey-head Star, which is our natural first choice. I had thought that's what had happened in the below diagram; however, the Central Star had somehow sneaked in its place. But since the size-ratio between the two stars is 1.0014, the mistake is invisible without substantial magnification. |
prostar7.png [img]https://i.imgur.com/xmRhdjH.png[/img]

| Either way, the star fits the image well
enough to date its the most likely origin to the Stone Age.
|
prost99.png [img]https://i.imgur.com/CHwgWMJ.png[/img]

| Above: This image shows the Monkey-head Star version. Among an impressive number of its aspects to like — four out of five of the star's tips are situated at the edges of engraved lines. The magnification puts the superfine precision of the work into view. |
|
|
prost11.png [img]https://i.imgur.com/oWNbuRY.png[/img]

As Above So Below The position near the Square's bottom corner also involves 5-pointed stars. Based on experience, to solve the mystery of their design, naturally, the Monkey-head Star is the first go-to thing to try. |
prostara.png [img]https://i.imgur.com/YVjlWdL.png[/img]

| The
star was inserted at the end of line section 'a' which
belongs to the Mother Star. This experiment is an immediate success because the pentagonal line 'c' of the Monkey-head Star pinpoints the edge of a long engraved line associated with the implied stars. Thus, we have two top lines of a pentagon of an unknown size, once again. Line 'd' is the Mother star's central axis, and the only significant line in this area. Let it set the length of the pentagon's side. Then this side implies the little green star; and the result is a success, once again. The bottom line of the green star's pentagon now pinpoints the line edge on a substantial section of the engraved line. |
prost16.png [img]https://i.imgur.com/dz91YGS.png[/img]

| Next,
the bigger red star is created from the smaller one. Of
note — the yellow line, pinpointing another edge of an
engraved line, is also derived from the first, the
smaller star. |
prost100.png [img]https://i.imgur.com/cOH1ZYm.png[/img]

| The position seems to translate to a theorem saying that a Ø-ratio projection of any pentagon/pentagram constructed from 'a' and 'b' will produce a right angled triangle from lines 'a' 'c' 'd'. |
prosta9.png [img]https://i.imgur.com/S8mhkQn.png[/img]

| Next, the Ø projection of the first star
serves as a basis for the large green star — its inner
pentagon height equals the radius of the Ø projection's
circle. Further progress is made: one of its arms pinpoints yet another straight engraved line's edge in this position two intersections of the green star's arms with its smaller version give a line pinpointing yet another straight edge of an engraved line |
proste5.png [img]https://i.imgur.com/AX08CSu.png[/img]

yellow circle = 1/34 inch =0.75 mm
prosty2.png [img]https://i.imgur.com/89kDKSO.png[/img]

| The
arrows show that expansion of the star matrix produces more
extremely accurate bounding lines for
the image. |

prosty7.png [img]https://i.imgur.com/8pTc48B.png[/img]

Above: Arrows show more lines accurately oriented to the Mother Star angles. |
prost77.png [img]https://i.imgur.com/ZORl42A.png[/img]

prost91.png [img]https://i.imgur.com/RCbIblZ.png[/img]

| The above
pattern is based on originally starting with the
Monkey-head Star. A comparison of this version with
the Central Star version in the areas pointed to by the
arrows given in magnified details below shows superior
accuracy for the Monkey-head version. |
[img]https://i.imgur.com/vvyEiBp.png[/img] [img]https://i.imgur.com/6S6ydJ6.png[/img]
prost96.png prost95.png


| The Central
Star versions on the left — the Monkey-head Star on the
right The latter ones seem 100% accurate showing insurpassable precision. |
[img]https://i.imgur.com/NaFQ8n2.png[/img] [img]https://i.imgur.com/tICDoNF.png[/img]
prost97.png prost93.png


prost.png [img]https://i.imgur.com/K8Q6Oa6.png[/img]

The Game of Faces — two heads — one designer Mirror the monkey across Mother Star's vertical axis. Except for a tiny bit, the monkey's face covers Athena's face entirely. The monkey now seems to have a detailed face of its own. Athena's right eye just happens to be right where one would expect the monkey's right eye! |
[img]https://i.imgur.com/U4W6BtF.gif[/img]

[img]https://i.imgur.com/KLnpXEm.gif[/img]

[img]https://i.imgur.com/Ojm0DcE.png[/img]

I also tested for the best mutual fit when the two heads overlap without changing orientation. I moved the monkey figure by its head, along with the Square toward Athena's head, stopping before the monkey's head could protrude through the far side of Athena's head. The result is seen below, and it looks like it was planned already 15,000 years ago. In a stunning effect, just like the monkey's head & arm, Athena's head is now also perfectly aligned to the horizontal line through the Square's top corner. Starting from the left ear, follow the the outline of the monkey head counter-clockwise to witness its flow in close correspondence with the features of Athena's head. The monkey's chin completes the obovoid suggested by Athena's head. Change the size of either head even a little bit, and the accurate fit will worsen; the more such change, the more the fit will worsen. This experiment and those above and below document soundness of the idea of analyzing both Athena and the monkey brought to the 1 : 1 scale by unifying their Mother Stars. |
[img]https://i.imgur.com/r5BowOa.png[/img]

[img]https://i.imgur.com/KLnpXEm.gif[/img]
 Obovoid
| Rotate the monkey around the Mother Star's center by 54 degrees to the left (54° is one of the angles found on the star). This time, Athena's face is entirely contained in the monkey's head. Moreover, the arms, and especially, the hands of the monkey correspond strongly with Athena. The second illustration down shows it in magnified detail. |
[img]https://i.imgur.com/S5qj9Zb.png[/img]

[img]https://i.imgur.com/qa7ByE6.png[/img]

|
|
|
Notes
Nazca Lines theories The entire Nazca plain and some of the surrounding Andean foot-hills present a spectacular panorama. Everything is on a huge scale — hilltops terraformed flat, a tangle of miles long lines, trapezoids, animal and plant figures spanning hundreds of feet. Not surprisingly, Nazca theories are dime a dozen, often on the borderline of reason. Of this merry company, Däniken's astronaut theory has provoked the most scorn from academicians, unanimously relegating it to the lunatic bin. Yet, Däniken was right in assuming that an advanced civilization had somehow played a role at Nazca. But even the far more serious and methodical Maria Reiche, the savior of Nazca from being plowed into fields, had her theory about astronomical alignments dismissed. That has cast a shadow in which Reiche's observations on the geometry within the figures are simply overlooked. Johan Reinhard notes that an extraordinary proportion of trapezoids trace the course of geological faults bearing water from aquifers. It throws some light on those trapezoids and triangles. Anthony Aveni's popular theory about the religious-magic significance of the Nazca lines presumes that because of the dry micro-climate, water was uppermost on the collective mind of Nazcans; so, they had made the lines for walking as a form of rain-dancing. For support, he cites a mystical experience he had when walking contours of the hummingbird figure. Clearly, explaining the lines by the animal figures, as Aveni does, yet denying connections between the two, is a glaring faux-pas. And if Nazcans had indeed adopted Paracan magic practices of decorating the desert, why did they create an entirely new style and treat the older figures as if they weren't there? Perhaps, a line crossing over a figure doesn't make the line ages younger, and irrelevant to the figure... Aveni says that Nazcans had traditionally associated spiders with water, hence the giant spider glyph keeps in character with the aqueous aspect of Nazca— while my memories of saving spiders accidentally fallen into water, most drowning almost instantly, associate spiders with dry places. Soliciting rain by walking over lines and figures which require dry climate to survive seems counter-intuitive. Given a few generations, Nazcans would accept that it just never rains at Nazca. They would see the old figures and lines as lasting forever and get the idea of adding their own share to this eternal gallery. That may very well be so; however, knowing the mathematical nature of the nine-fingered Nazca monkey and its broadband connection to the Athena Engraving and Giza, the concatenation of a thousand fragments, convinced me that overall the Nazca lines and figures are the work of a scientifically and technologically advanced agency. Since practically everything at Nazca is interconnected, the whole must be telling quite a great story. |
...
how to draw infinite series of golden circles
descending series:
• Start with two circles that are in Ø (Phi)proportion.
• Move the smaller circle '2' to the center of the larger circle '1' and draw a line through their centers.
• The next circle '3' is centered at the edge of circle '1' and drawn through the center of '2'.
• The next circle '4' is centered at the edge of circle '2' and drawn through the center of '3'.
and so on
For ascending series simply reverse the process.
.Lines connecting circle intersections on each side hold the angle of 72°.
[img]https://i.imgur.com/jEtbEKL.png[/img]

[img]https://i.imgur.com/g1wdvMQ.png[/img]
-

| Configurations
involving the Golden Proportion are always aesthetically
pleasing. |
[img]https://i.imgur.com/ZQ3wUIG.png[/img]
.........................................

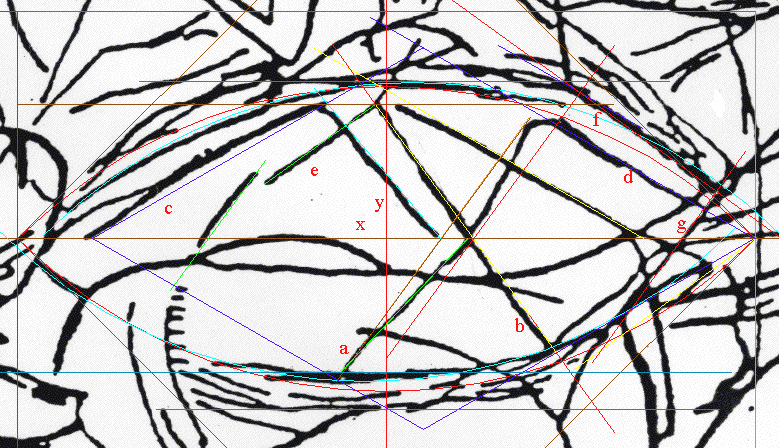
Line c holds a 30 degree angle with the x-axis — it is the chord subtending an engraved arc
Line e holds a 36 degree angle with the x-axis.
Line a holds a 36 degree angle with the y-axis — it is the chord subtending an engraved arc
The upper section of line a coincides with one of Mother Star's angles
Line b holds a 36 degree angle with the y-axis
Line d holds a 30 degree angle with the y-axis
Line f holds a 36 degree angle with the x-axis
Line h holds a 30 degree angle with the x-axis
(some edges of 'h' conform to a Mother Star angle - 0.266 degree difference to the Square's 30 degrees)
If you'd like to contact me, or weigh in with an opinion, I am at Yahoo.com. Just use Jiri Mruzek without the space on the left of @Yahoo |
| Top Menu | Next | Athena Framed | The Giza Plan | Osiris Numbers | The Horse Debate |